Tuesday, November 30, 2010

Encore Presentation Michelle Perkett Studio Flying Birthday Girl


My card today is an "encore presentation" from July - the definition:  We are re-visiting a card I made back in July using a Michelle Perkett Studio digital image.   Our Thanksgiving holiday weekend was filled with family and friends and not much creating time so that's the reason for my "rerun".   I hope you don't mind!

This cute little flying birthday girl was fun to color with Copic markers, is printed on cream cardstock, I then  realized my plan for the clouds wouldn't work with cream card stock so I re printed my image on white and paper pieced the clouds so I could flick some color onto the bottoms of the clouds with Copic markers to make them more realistic.

The scalloped frame is two Spellbinders dies and I used Cuttlebug embossing folders to add more polka dots and swirls to the background papers.  I added three flowers in the top left corner and a touched up (with my Copic marker) Dew Drop to the center of each flower and two more touched up brown Dew Drops on the panel at the bottom.  The dotted organdy ribbon is to cover a little tiny boo boo and last of all I stamped "make a wish" from one of my Papertrey Ink stamp sets. 

We have a new challenge that starts today at our Michelle Perkett Studio blog you won't want to miss, I hope you can play along! 

Monday, November 29, 2010

Stamps R Us Holiday Card Challenge

There's a new Holiday Card challenge starting today at our Stamps R Us blog being sponsored by none other than Bug A Boo Stamps!   If you're wondering why I'm so excited about our sponsor that's because I'm one of their newest design team members!!!  I LOVE Jodie's images and I'm very excited to be part of the Bug A Boo Stamps design team.  

On to my card, this is one of the November Stamp Club images, I colored with Copic markers T1, T2, T3, R22, R24, 27, Y15, Y18, E40, E41, it's cut out with a Spellbinder's Oval and matted with the Oval Scalloped dies.  The white panel is embossed with the Cuttlebug Snowflakes embossing folder and the Stampin' Up! Cameo Coral panel is embossed with the Cuttlebug Swiss Dots embossing folder.  The snowflake is from the MFT Stamps Die-namics Snowflakes die, I added a black rhinestone to the center and the "Merry Christmas" sentiment is from a Papertrey Ink stamp set.

Challenges: 
Stamps R Us - Holiday Cards
Stamp & Create - 'Tis The Season
A Spoon Full Of Sugar - Anything Goes

Saturday, November 27, 2010

Michelle Perkett Studio Twinkle

Welcome to our Christmas Card Blog Hop! 
If you've come from visiting Debbie at Two Ladybugs From China, you're in the right place. If not and you'd like to play along with our blog hopping fun, you can go to the beginning at www.craftycardgallery.blogspot.com.  Our blog hop is intended to help you get into the Christmas Spirit.... If you haven’t already started your Christmas cards, hopefully this will inspire you to come up with an idea... and maybe you can win some blog candy or get ideas for great Christmas gifts (whether they’re on your list or for someone else!).  So if you have a little computer time, come join us for some fun!
  
For my Christmas card today I C. A.S.E.d Joanne, The Inky Ocean Gazer because I love her style, she makes beautiful cards, the sketch, the texture and I'm just a fan of hers! 
The cute little snowman is by Michelle Perkett Studio called Twinkle and is a freebie at Crafters Digital Art Center for the members of her group there.    Twinkle is colored with Copic markers B21, B24, B28, R22, R24, Y32, Y35, C6, C3, G0000.  I trimmed around him with my paper cutter as close as possible, rounded the corners and matted each layer with Basic Black.  The white card stock is Neenah Classic Crest Solar White embossed with the Cuttlebug Snowflakes folder, the next panel is Stampin' Up! Brilliant Blue embossed with the Cuttlebug Stars embossing folder.  I also used two dies from My Favorite Things Stamps for the snowflakes and extra large ric rac in Stampin' Up! Brocade Blue.   I added a white half pearl to the smaller snowflake and the sentiment is from a Papertrey Ink acrylic stamp set. 

I hope you are enjoying your long holiday weekend and our blog hop, your next stop is the fabulous Joanne at Sleepy In Seattle Stamps!

Please don't forget you still have time to play along in the Michelle Perkett Studio Happy Holiday's challenge too!  All you need to play is a Michelle Perkett Studio digital image, if you don't have one you can visit Michelle's  Etsy Shop.

Michelle Perkett's Etsy Shop Announcement

50% OFF SALE - FRIDAY AND SATURDAY (NOVEMBER 26TH 12AM - NOVEMBER 27TH AT MIDNIGHT PST) 

Or for freebies at her groups on Paper Craft Planet, SNR Card Universe and Crafters Digital Art Center.  There will be a prize drawn and a winner announced on the Michelle Perkett Studio blog Monday evening.

Challenges:
Michelle Perkett Studio - Happy Holiday's
Crafty Calendar Challenge - Winter Snowflakes
Paper Cutz - Anything Goes
Stampin' B's - Holiday Card
Bah! Humbug! - Feelin' The Blues
Crafty Catz - Christmas
Crafty Sentiments - Christmas
Digital Tuesday - Let It Snow
Scrapbook Sisters - Let It Snow
Crafty Creations - Christmas Is Coming
Inktegrity - Anything Goes
Simon Says Stamp - Let It Snow
Freshly Brewed Challenges - Winter/Christmas
Fab & Funky - Anything Goes
ABC Christmas - Christmas


Friday, November 26, 2010

More Kids Birthday Cards


Is anyone home blog browsing today or is everyone out on the busiest Christmas shopping day of the year?!  I hope you had a really nice Thanksgiving holiday with your families, we had a nice day here.

My cards today are from a batch of birthday cards I made for the kids at our church.  They are the same yet different but only slightly.  


The cute monkey's were given to me by one of my stamping friends who made them with her Cricket machine.  I made up cards to use them on with one of the Operation Write Home Stars & Stamps sketch challenges from last month.

Have a nice Thanksgiving Weekend!

Challenges:
Daisy Doodles - Anything Goes

Thursday, November 25, 2010

Thanksgiving with The Stamping Boutique

Happy Thanksgiving!
I hope you're having a nice day with your families and have a long weekend to relax and enjoy yourself.


Both of my cards today were really fun to make, this first one uses A.J. The Pilgrim by The Stamping Boutique and is colored with Copic markers.  I was interrupted several times while coloring A.J. so the process took a couple of days and I don't remember all the marker colors but I did try a new combination for his pants and jacket, E70 & E71.  The sketch layout is Mojo Monday 166, the papers are Memory Box Black Bird patterned paper and Stampin' Up! Really Rust with Basic Black and Neenah Solar White.  Spellbinders dies were used to cut out A.J. and the sentiment which I picked up as a freebie at Sentimental Sunday's just the other day and I added three brads to the strip of black card stock to mimic the sketch.


Are you ready for a little desert after A.J. and his turkey?!
This is another image by The Stamping Boutique, it was a freebie last weekend during our Thanksgiving blog hop.  I've enjoyed coloring pumpkins so much this year!  It must be the Copic markers...  Both of my boys love pumpkin pie so this image was just fun for me!  

Here are the Copic markers I used:  C00, C1, C3, C6, E41, E42, E43, G21, G24, YR04, YR07, YR09, YR15, YR16, YR18.   The sketch is one I've used before but I couldn't find it in my sketch file to share with you exactly where it's from.

Challenges:
Mojo Monday - Sketch 166
Sentimental Sunday's - Thoroughly Thankful
Paper Playtime - Thank You
Artful Inkables - Punches or Die Cuts
Papertake Weekly - Cut It Out

Wednesday, November 24, 2010

Clear Dollar Stamps Patch Pal Scarecrow Pumpkins Digital Set

I have a clean and simple one layer card to share today, I used a digital image from Clear Dollar Stamps called Patch Pal Scarecrow.  After printing the image I used a Copic multiliner pen to outline around it, then colored it with Copic markers.  I ran out of orange ink in one of my markers on the first pumpkin the farthest to the left so I had to switch oranges.  Can you tell?!

Here's my supply list:

Cardstock/Pattern Papers - Clear Dollar Stamps Patch Pal Scarecrow – pumpkins digital image
Ink/Markers - Printed using HP LaserJet printer, Copic markers YR00, YR04, YR07, YR09, YR14, YR15, YR16, YR18, G20, G21, G24, G28, R22, R37, E000, E43, W0, W1, W3, W4, T1, T2, T3, T5.  Copic Multiliner 0.3
Accents/Tools - Tim Holtz idea-ology clear ruler.
Techniques – Coloring with Copic markers, Dotted background technique, One Layer Card

Challenges:

Tuesday, November 23, 2010

Michelle Perkett Studio Snow Family

We have a new Happy Holiday's challenge starting today at Michelle Perkett Studio
The challenge is to make a holiday card using a Michelle Perkett Studio digital image.  The image I chose for my challenge card is Snow Family Wishing.  I decided to try a "white on white" card which was a challenge in itself for me!  The Snow Family is colored with Copic makers and layered on Neenah Solar White card stock, one layer I put through the Cuttlebug with a snowflake embossing folder and rounded the corners.   I couldn't help myself I had to put a pop of Brilliant Blue in there too,I ran it through my paper crimper that I hadn't put away yet just for fun.   

I hope you have time this week to join in on our challenge at Michelle Perkett Studio, there will be a prize drawn next Monday and who knows you could be the lucky winner of one of Michelle's fun digital images!

Challenges:
Michelle Perkett Studio - Happy Holidays
Fairy Tale Designs - White
Die Cut Dreams Christmas - Anything Goes Christmas
Scrappy Frogs - Merry Christmas
Alota Rubber Stamps - Christmas
Really Reasonable Ribbon - Christmas
Creative Inspirations - Christmas - Winter
Elephantastic Challenges - Christmas Theme
Stampin' With The Dragon - Inspired by a Song - Let It Snow, Let It Snow, Let It Snow
Incy Wincy - Blue & White
Digital Tuesday - Let It Snow plus digital image
Anything Goes - Let It Snow

Monday, November 22, 2010

Bug A Boo Stamps November Club...


I bought the Bug A Boo Stamps November digital stamp collection and just love this cute little bird!
Did you notice I used that sketch I've been obsessed with again?  Maybe I should draw your thoughts away from those things that I'm obsessed about!  Moving on...  

I colored the skating bird with some of my favorite Copic markers BG10, BG11, R22, R24, R27, E41, E42 cut it out with Spellbinders oval and scalloped oval nestabilities dies and placed it on a Papertrey Ink Aqua Mist panel embossed with the Swiss Dots Cuttlebug embossing folder matted in black.  The white panel is embossed with the Cuttlebug Snowflake embossing folder, the "Winter Wishes" is a stamp by Papertrey Ink and the snowflake is a die from MFT Stamps that I added a coordinating rhinestone to.

One of the reasons for making this card was to enter it into the Operation Write Home Stars & Stamps Midweek Throwdown  "Winter Themed" challenge and just the fun of working with the sketch and coloring the cute bird is really enough for me.  

Challenges:
Operation Write Home Stars & Stamps - Winter Theme
Delightful Challenges - Baby It's Cold Outside 
Stampin' For The Weekend - Winter Theme 
One Stitch At A Time - Season or Event 
Pile It On - Winter Means 
Simply Scrapping Crafts, Copic Challenge Corner - Anything Goes

Saturday, November 20, 2010

Michelle Perkett Studio Snow Family

Hi!  If you are blog hopping with The Stamping Boutique today please scroll down one post and you'll be there!

Introducing Snow Family by Michelle Perkett Studio!


I really like the new holiday images Michelle Perkett Studio has just released, my card today is from the Snow Family collection called Snow Family Singing.  I colored this cute digital image with Copic markers BG10, BG11, BG13, BG72, T1, T2, T3, G0000, R22, R24, R27, YR04, E41, E42, E43, Y13, Y15 and used the Stampin' Up! Top Note die to frame it.  
I used a Spellbinders rectangle die to cut out the center and make the frame, I left the Spellbinders die in place and took it over to my Cuttlebug and placed a snowflake embossing folder open on my "B" plate, the Top Note panel I'd cut out with the Spellbinders die in it, an embossing pad and then the other "B" plate on top and ran it through the Cuttlebug with my fingers crossed.  I "debossed" it instead of embossing it but was okay with that, I can try again.  My biggest worry was cutting into the plastic embossing folder.  I didn't see any marks on the embossing folder when I was done, but I haven't embossed anything else with that folder yet either!  If you're going to try it, I'd suggest not using your favorite plastic embossing folder till you know for sure.  I hope my explanation made sense, if not let me know and I can take some photos of the process and post them another day.
I also used a new Cuttlebug embossing folder for me, of course I can't remember what it's called but it has the music notes on it.  I popped the frame with foam tape and added snowflakes made with the MFT die-namics snowflake die and added coordinating rhinestones to them.   
You still have a few days left to make a Michelle Perkett Studio challenge card too, 
the challenge is "Lets Be Thankful"

Challenges: 
Paper Play - Let It Snow
Stampin' Bee's - Use A Snowflake
Easy Craft Projects - Snow
Totally Paper Crafts - Snow & Snowflakes
2 Sisters Challenge - Snowflakes
 Totally Gorjuss - Not So Traditional

Friday, November 19, 2010

Audrey The Pilgrim by The Stamping Boutique

Welcome to our The Stamping Boutique almost Thanksgiving blog hop!
If you arrived here from Stacie's blog you're on the right track, if not and you'd like to start at the beginning click here.


For my card I used Pilgrim Audrey, she's colored with Copic markers E40, E41, E42, E43, E44, C00, C1, C3, YR00, E00, E000, R02 cut out with Spellbinders oval and scalloped oval nestabilities dies and matted on a piece of brown paper bag (the lunch sack variety) that I put through the paper crimper and attached to a panel of Nut Brown card stock.  I must warn you, I seem to have an obsession about this sketch layout I can't stop making it!  Hopefully I can space out the blog posts with other projects between all the cards I've made with this basic layout.  

I also used the Swiss Dots Cuttlebug embossing folder on the very top of the white panel and the "Give Thanks" on the bottom is a rubber stamp by Copper Leaf Creations.  Two Dew Drops from the Men's collection on either side of Audrey's scalloped oval finished off my card.

As you've read at the other designers blogs we are playing a secret letter game for a prize, to be eligible to win you have to leave a comment on each blog on the hop and my letter is "K".
There's also a free digital image at The Stamping Boutique here.

I hope you are enjoying our blog hop and have a blessed Thanksgiving with your family!
Your next stop on this tour is our very talented Jenn!

Challenges:
For Fun Challenges - Thankful
Stampavie - Monochrome 
Stamp Something - Thanks 
Our Daily Bread Designs - Holiday 
My Sheri Crafts - Thanksgiving 

Papertrey Ink Friendship Jar Holiday


I have another Christmas card to share today!  
I'm getting a pretty good stash and should be able to start getting them in the mail right after Thanksgiving.  The only problem with my Christmas cards are friends tell me that they've received my card and how much they liked it but I'm not sure which one it was!  Beats mass production though ;)

I used actual acrylic stamps for this card from Papertrey Ink, the jar is from the set Friendship Jar and the candy canes are from the set Holiday Jar Fillers.  I used Neenah Classic Crest Solar White with Memento Tuxedo Black ink and colored with my Copic markers.  I had to do a little masking to get the candy canes "in the jar".  You should have seen my first one!  I masked the wrong thing and it looked really weird, they were on the outside.  My layout is clean and simple using a sketch from a Sunday OWH sketch challenge last summer.  The ric rac is an extra large die from My Favorite Things.

Challenges:
Fab & Funky - Forget Me Not (acrylic stamps)
Daring Cardmakers - We Three 

Thursday, November 18, 2010

Clear Dollar Stamps Autumn Joy

My card today uses the Clear Dollar Stamps digital image Autumn Joy, I think it fits the season very well in most areas of the country or is it "winter" now?  I live in Arizona so it's a little different here, we're having high temperatures in the 80's at this time of year and still need air conditioning in the middle of the afternoon some days.  A welcome relief though after the 115 plus temps we had a few months ago.  I'm just trying to explain I'm not really positive what "autumn" looks and feels like as I've lived in this area since I was ten years old.  

This was a really fun image to color with my Copic markers and don't you just love the Designer Label die set Clear Dollar Stamps came out with last month?  There are so many possibilities with this three piece die set, I can't wait to try them all! 

Since I'm on the Clear Dollar Stamps design team once again I'll have a supply list for you when I post my cards made with their products. 
Autumn Joy Digital Stamp
Cardstock/papers:  The Papermill Nut Brown, Neenah Solar White, Neenah Red Linen, Via Vellum Leaf Green.
Inks/Markers: Printed on HP laser printer, colored with Copic markers – YG11, 13, 17, E41, 43, 44, R22, 37, B0000 & C0.
Accents/Tools:  Spellbinders rectangle and scalloped rectangle dies, Clear Dollar Stamps Designer Label dies, Cuttlebug Embossing Folders – Swiss Dots & Victoria, Dew Drops “Men” color
Techniques:  Dry embossing

Did you notice my visitor counter has just passed 50,000?!!  Thank you so much for stopping by and visiting my blog, it's really exciting to have so many visitors!

Challenges: 
Fresh Brewed Designs - Show Off Your Style
Copic Oz - Copic Feathering Technique 
Digi Doodles Shop's Best - Anything Goes 
Southern Girls - Favorite Color (Fall) 
AI Factory - Dies or Punches 
Hodge Podge Shop - Anything Goes 
Fairy Tale Challenge - Anything Goes 

Wednesday, November 17, 2010

The Stamping Boutique Winter KK

My card today is for the Stamps R Us challenge "Sparkle & Scallops" that started Sunday and goes for the next two weeks.  The Stamping Boutique is the sponsor for this challenge so I wanted to make a card since I'm on their design team and also contribute to the Stamps R Us challenge blog when I can. 

I love Tracey's Winter KK image, I'm sad my glittery snowflake doesn't show up in the photo very well, you'll just have to come over and see it in person.  The two purple glittery strips were made with Scor-Tape and sprinkling glitter over it.  KK is colored with Copic markers BG10, BG11, BG13, BG18, R21, R22, R24, E44, E49, E59, E31, E00, E000, YR00, C6, C3, E42, E43.  The scalloped dies I used are made by Spellbinders and My Favorite Things Stamps, papers are Stampin' Up! Cameo Coral, Taken With Teal, Neenah Solar White and Cosmo Cricket Pinkalicious.

Challenges:
Stamps R Us - Sparkle & Scallops

Tuesday, November 16, 2010

Michelle Perkett Studio Woofie In The Snow

Wow, what a weekend!  Did you make it through the Operation Write Home "Be My Valentine" blog hop?!  It took me two days, I visited every blog I could get into and left a comment, whew...  it was so fun!  I kept track of how many visitors I had here from 7:00 AM Saturday morning when the hop started (my time zone) till 11:00 PM Sunday evening - I had a staggering 447 visitors in that time period.  I'm always amazed at the participation in the Operation Write Home blog hops and all the nice comments our visitors leave. 
Speaking of comments...
It's time to announce the winner of my OWH blog hop blog candy!
I used random.org to choose and the winner is Grandmalee!
Congratulations Lee, I will be contacting you shortly!  
Minimum:  1
Maximum:  172
Result:  111

The rest of my blog post is about "Woofie" by Michelle Perkett Studio.


"Woofie" is a new release from Michelle Perkett Studio and there is another Woofie and a Woofie set, they are all available in Michelle's Etsy store.  I hope to have another Woofie from Michelle's collection for you this Saturday. 
For my card I used Woofie In The Snow.  I colored Woofie with Copic markers E43, E42, E42, E04, R22, R24, R27, G20, G21, G24, G28, trimmed as close as possible with my paper trimmer and matted on Gina K's textured hunter green card stock.  There was just enough room to frame my first panel so I ran a left over piece of Neenah Solar White through the Cuttlebug with a Sizzix large polka dot embossing folder and added it to the hunter green card base.  Before sticking it all down I tried out the Sparkle & Sprinkle Twinkling Clouds foofla on Woofie's hat.  Then I added little white half pearls to the dots I'd colored over on the trees.  I had some snowflakes in a bag close by so I thought they'd be fun to use too with a couple of red rhinestones I bought at Micheal's the other day.   
I'm pretty happy with the way "Woofie In The Snow" turned out!

I hope you'll join us at the Michelle Perkett Studio challenge this week!
 I thought you might like to see the other two "Woofie's"!

And...  Michelle's Snow Goddess is 20% off until November 19th!


Challenges:
Magical Monday Challenge - Let It Snow
Paper Playtime - P.S. I Love You! 
Lexi's Creations - Traditional Christmas Colors 
Anything Goes Challenge - Emboss It
Flourishes - Christmas

Monday, November 15, 2010

Clear Dollar Stamps Bitty Tree

It's the 15th of November already -  New release day at Clear Dollar Stamps!

For my card today I used the Christmas tree from the Bitty Tree & Snowflake digital stamp set by Clear Dollar Stamps.  I colored mine with Copic markers but the set comes with pre-colored images too!  

This was a really fun card to make using the digital images from this set.  The Merry Christmas and tree are separate images and I used the png format so I could overlap them in my Microsoft Publisher program and print it out.  Wait till you see my tag below, I re-sized these images so they work in a smaller format without too many test runs!  
For the tag I used the Designer Die set that Clear Dollar Stamps released last month along with a Papertrey Ink tag die.  I love the layers the Designer die set has and the clear templates that come with the set are wonderful for lining up your image under the die for a perfect cut every time.  One of those "must haves" in my stash of goodies to make cards with!

Here are my supply lists:

Stamps/Images:  Bitty Tree digital set
Cardstock/Papers:  Neenah Classic Crest Solar White, Papertrey Ink Black, Basic Grey Jovial
Inks/Markers:  HP Laserjet printer, Copic Markers Y32, Y23, YR31, E42, E43, R35, R39, YG91, YG93, YG95
Accents/Tools:  Stampin’ Up! Crystal Effects, Stickles Ice, Zva Rhinestones, Stampin’ Up! Word Window Punch, Spellbinders Circle & Pinking Circle dies.
Techniques:  Digital Images

Stamps/Images:  Bitty Tree digital set
Cardstock/Papers:  Neenah Classic Crest Solar White, Papertrey Ink Black, Basic Grey Jovial
Inks/Markers:  HP Laserjet printer, Copic markers Y32, Y23, YR31, E42, E43, R35, R39, YG91,YG93
Accents/Tools:  Clear Dollar Stamps Designer Label dies, Papertrey Ink Tag die, Spellbinders Circle die, Olive Green Organdy Ribbon, Gold Cord
Challenges: 
Cute Card Thursday - Anything Goes
Lily of The Valley - Anything Goes 

Sunday, November 14, 2010

Gingerloft Dog With Butterfly

If you're looking for the Operation Write Home blog hop it's right below today's post!

My card is for the Gingerloft Stamps blog, I have the honor of being their guest designer for this challenge "The Great Outdoors".  The digital image on my card is by Gingerloft Stamps and it's called Dog with Butterfly, it's colored with Copic markers and cut out with Spellbinders oval and scalloped oval dies.  My layout is a sketch and I'm sorry I can't remember where it's from today.  

Have a blessed day!

Saturday, November 13, 2010

Operation Write Home Veteran's Day Blog Hop

Welcome to our Operation Write Home Veteran's Day "Valentine" blog hop!  You should have arrived here from the fabulous Rick St. Dennis blog, if not, you can start at the beginning here.

Our blog hop is a Valentine hop because the deadline to send Valentine cards to our shippers is January 7, 2011, and we all know how quickly times passes!  Here's a link to the main OWH blog where you can find different card deadlines, shippers addresses and lots of other valuable information.

First I have some photos I'd like to share that I found at the OWH Flickr gallery.


Our cards that are donated to Operation Write Home are a blessing to our troops and their families.  I thought you'd like to see a glimpse of where your cards go.


I also have a great story for you today that was sent to me in an e mail from my friend Amanda.  
I hope you enjoy it as much as I did.

Snack Lunches

I put my carry-on in the luggage compartment and sat down in my assigned seat. It was going to be a long flight. 'I'm glad I have a good book to read. Perhaps I will get a short nap,' I thought.
Just before take-off, a line of soldiers came down the aisle and filled all the vacant seats, totally surrounding me. I decided to start a conversation.

'Where are you headed?' I asked the soldier seated nearest to me.

'Petawawa. We'll be there for two weeks for special training, and then we're being deployed to Afghanistan.

After flying for about an hour, an announcement was made that snack lunches were available for five dollars. It would be several hours before we reached the east, and I quickly decided a lunch would help pass the time...

As I reached for my wallet, I overheard a soldier ask his buddy if he planned to buy lunch. 'No, that seems like a lot of money for just a snack lunch. Probably wouldn't be worth five bucks. I'll wait till we get to base.'

His friend agreed.

I looked around at the other soldiers. None were buying lunch. I walked to the back of the plane and handed the flight attendant a fifty dollar bill. 'Take a lunch to all those soldiers.' She grabbed my arms and squeezed tightly. Her eyes wet with tears, she thanked me. 'My son was a soldier in Iraq ; it's almost like you are doing it for him.'

Picking up ten snacks, she headed up the aisle to where the soldiers were seated. She stopped at my seat and asked, 'Which do you like best - beef or chicken?'

'Chicken,' I replied, wondering why she asked. She turned and went to the front of plane, returning a minute later with a dinner plate from first class.

'This is your thanks.'

After we finished eating, I went again to the back of the plane, heading for the rest room. A man stopped me. 'I saw what you did. I want to be part of it. Here, take this.' He handed me twenty-five dollars..

Soon after I returned to my seat, I saw the Flight Captain coming down the aisle, looking at the aisle numbers as he walked, I hoped he was not looking for me, but noticed he was looking at the numbers only on my side of the plane. When he got to my row he stopped, smiled, held out his hand and said, 'I want to shake your hand.' Quickly unfastening my seatbelt I stood and took the Captain's hand. With a booming voice he said, 'I was a soldier and I was a military pilot. Once, someone bought me a lunch. It was an act of kindness I never forgot.' I was embarrassed when applause was heard from all of the passengers.

Later I walked to the front of the plane so I could stretch my legs. A man who was seated about six rows in front of me reached out his hand, wanting to shake mine. He left another twenty-five dollars in my palm.

When we landed I gathered my belongings and started to deplane. Waiting just inside the airplane door was a man who stopped me, put something in my shirt pocket, turned, and walked away without saying a word. Another twenty-five dollars!

Upon entering the terminal, I saw the soldiers gathering for their trip to the base.

I walked over to them and handed them seventy-five dollars. 'It will take you some time to reach the base. It will be about time for a sandwich.  God Bless You.'

Ten young men left that flight feeling the love and respect of their fellow travelers.

As I walked briskly to my car, I whispered a prayer for their safe return. These soldiers were giving their all for our country.. I could only give them a couple of meals. It seemed so little...

A veteran is someone who, at one point in his or her life, wrote a blank check made payable to ' the United States of America ' for an amount of 'up to and including my life.'

That is Honor, and there are way too many people in this country who no longer understand it.'


I have a couple of cards to share with you too!  
For my first Valentine card I used Mary Margaret by Michelle Perkett Studio, she's colored with Copic markers R22, R24, R27, T1, T2, T3, E49, E59, E33, E00, E000, YR00.   I used Spellbinders Oval and Scalloped Oval dies as well as a mini tag die, the tiny hearts she's holding are a Quickutz die.  I applied Stampin' Up! Crystal Effects to the hearts to give them some shine.   The layout is a sketch from Mojo Monday week 146, the papers are Neenah Classic Crest Solar White, Neenah Linen Red, Papertry Ink Basic Black, Stampin' Up! Basic Grey.  The dotted grey cardstock has gone through the Cuttlebug in the Swiss Dots embossing folder.  The sentiment is from a Verve Visual clear stamp set.


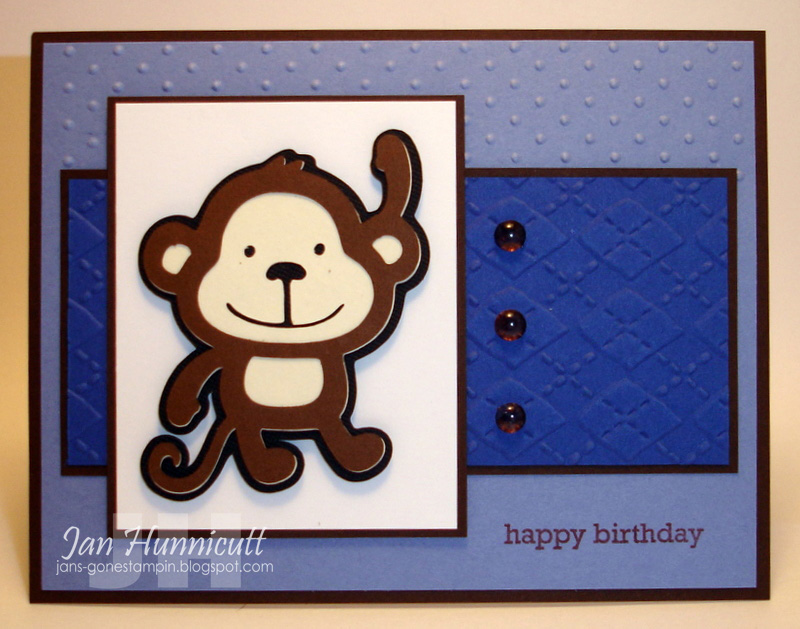
My second Valentine card uses a digital image from Bug A Boo stamps, isn't "she" cute?!
I colored the pup with Copic markers E41, E42, E43, E44, R22, R24, R27, W00, B0000 cut it out with Spellbinders circle and labels 9 dies.  The top half of the card is embossed with dog paw prints from a Fiskars embossing plate and I used two left over hearts from a Quickutz die on either side.  The card stocks used are Neenah Classic Crest Solar White, Neenah Linen Red, Stampin' Up! Creamy Carmel and Thepapermill.com Nut Brown.  "Be My Valentine" is from a Papertrey Ink stamp set. 

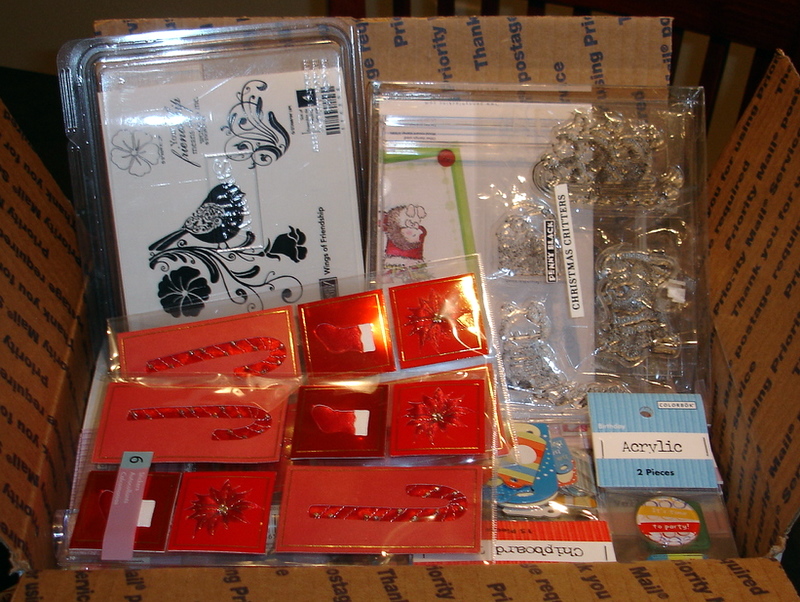
One more thing!  I have blog candy for you too!!


This is a medium flat rate Priority Mail box filled with goodies.  The bottom is packed with 8 1/2 x 11 card stock in a variety of colors, there are stickers, rub ons, chip board accents, acrylic and rubber stamps, etc. 

To win my blog candy please leave a comment at the bottom of this post.  I will draw a winner and make the announcement here Tuesday morning, November 16th!

Your next stop in our hop is the very talented Cindy at Cindy's Card Co., enjoy! 

Challenges:
Crafty Cardmakers - Dry Embossing
Karber - Animal use a digital image
Craft Your Passion - 2 Of Something - 2 Hearts

Friday, November 12, 2010

Boys Birthday Cards


I have a few more boys birthday cards I made at the beginning of the month for our church to share with you today.  One of my stamping friends gave me a bunch of these cute animals she'd made with her Cricket machine, I thought they were adorable and would be great for some of the birthday cards.


They were cute, simple and quick, I hope the kids like them!

Challenges:
My Time To Craft - Quick & Cute
For Fun Challenges - Dry Embossing
Paper Pretties - Embossing
Dutch Dare - Clean & Simple
Pixie Dust Studio - All About Men/Boys

Thursday, November 11, 2010

Veteran's Day 2010

Happy Veteran's Day! 


I'm so thankful we have this day to remember and give thanks to our heros for their service to our country.


My photos are courtesy of Operation Write Home's Flickr group.

Several of my stamping friends and I have gotten together recently to make paper backpacks.  My friend Paula has a tutorial on her blog that we followed to make them.

The first back pack uses Papertrey Ink Raspberry Fizz card stock and matching designer paper, the second one below is Papertrey Ink Lemon Tart card stock and designer paper from a Martha Stewart pad.
Paula is from California and vacations in Lake Havasu City each year, I can't wait to get together with her and a bunch of Stampin' Up! demonstrators this weekend!!  We all get together once a year with Paula and paper craft the day away.  I'm counting the days...
Challenges:
Fairy Tale Challenges - Everything Goes

Wednesday, November 10, 2010

Bug A Boo Stamps Birthday Pups


I have some fun birthday cards to share with you today!  
I've been working on several dozen birthday cards for our church and I'm down to the home stretch now.
I thought this collection of pups from Bug A Boo stamps would make nice boys birthday cards so I printed them on Neenah Classic Crest Solar White card stock and colored them with Copic markers E41, E42, E43, E44, BG10, BG11, E04, R24, R27.  


I didn't really have a layout in mind for these other than clean and simple.  This second one above was kind of a happy accident using scraps.  I used Spellbinders Circle and Labels 9 dies as well as My Favorite Things Extra Large Ric Rac and Stars border dies.  


The "happy birthday" stamp I used is from a birthday set by Papertrey Ink and the patterned papers are from a Basic Grey paper pad.


The other card stocks are Thepapermill.com Nut Brown, Neenah Sand, Papertrey Ink Aqua Mist, and Stampin' Up! Creamy Carmel.  

Today's the last day to get your design team "application" in for the Bug A Boo Stamps design team call too!  

I thought it was kind of neat that I was working with these images and came across their design team call, another "happy accident" maybe?!

Challenges:
Bug A Boo Stamps - Anything Goes
Iris's Spot - Anything Goes 
Lexi's Creations - Anything Goes

Tuesday, November 9, 2010

Michelle Perkett Studio Thanks Mum

There's a new challenge at Michelle Perkett Studio today!  
The challenge is "Anything Goes With A Michelle Perkett Studio Image", I hope you can join us!

I made my card today for my daughter Jenny, it's a surprise that I think I'll hide in her lunch box one day this week.  She's been feeling a little pre-teen lately and I think she could use a lift.  I stamped "you are special to me" inside, I hope she likes it!

I used the digital image Thanks Mum by Michelle Perkett Studio and colored it with Copic markers, the layout is Operation Write Home Stars & Stamps sketch challenge #42.  The card stock colors are Stampin' Up! Cameo Coral & Orchid Opulence, Neenah Classic Crest Solar White and Via Vellum Leaf Green.  I used a Sizzix polka dot embossing folder, a Spellbinders mini tag die along with a EK Success mini flower punch with a black half pearl.  Nice and simple.

I hope you're inspired to join our challenge at Michelle Perkett Studio!

Challenges:
Michelle Perkett Studio - Anything Goes with a MPS image
Operation Write Home Stars & Stamps - Sketch Challenge #42 
Alota Rubber Stamps - Tag You're It

Monday, November 8, 2010

The Stamping Boutique Snowman Sign


What a fun card to make!  

I used The Stamping Boutique's Snowman Sign digital image and colored it with Copic markers and cut it out with Spellbinders rectangle and scalloped rectangle dies.  The snowflakes are also a die from My Favorite Things Stamps die-namics line.  

It's so nice to have a die to cut snowflakes instead of those old dull punches.  This die is a little shallow so I do have to use a shim with it, waxed paper as the first layer being cut also helps eject the snowflakes after they are cut.   The layout for my card is a sketch by Alissa Marotta for the Stamps R Us challenge blog in October.  "Celebrate The Season" is a from a Papertrey Ink stamp set and the card stock colors are, Neenah Classic Crest Solar White, Neenah Linen Red, Stampin' Up! Brilliant Blue, Stampin' Up! Creamy Carmel and I added some nice blue rhinestones to finish it off.

Challenges:
Crafty Ann's - Christmas with non traditional colors
Easy Craft Projects - Red 
Pattie's Creations - Christmas 
Bee Crafty - Christmas
MelJens - Use 3 Different Shapes
One Stop Craft Challenge - Embossing
CRAFT - Dry Embossing
Crafty Calendar Challenge - Winter Snowflakes
City Crafter - Get Your Digi On
The Creative Cottage - Embossing
The Paper Players - Use A Snowman
Paper Sundae's - Let It Snow

Saturday, November 6, 2010

Michelle Perkett Studio Boy & Dog Bookplate

You might have noticed I missed a few blog posts this last week.  I have a large order for birthday cards I've been working on and I've had classes with stamping friends too.

  And then there's a new computer with Windows 7 I'm getting used to.  I like it, but not everything that's connected to it works correctly the first time so I've had to re-visit some of the installations and figure out what to do to make it all work.  One day soon I should be back to full crafting capacity.    

For this card I tried a new to me color combination B24, B26 & B28.  I have a need for our school colors with cards coming up and came across some Stampin' Up! Brilliant Blue card stock so I thought I'd see how close I could get.  These three colors blended together effortlessly for me on the Neenah Classic Crest Solar White card stock.  The card layout is Operation Write Home Stars & Stamps sketch #41.

The image I used for this card is by Michelle Perkett Studio called Boy & Dog bookplate.  I used my photo editing software (Picasa 3) and cropped the outline and text from around the picture so I could make a birthday card instead of a bookplate.  I hope Michelle isn't unhappy with me for altering her art work.  That's one of the reasons I like digital images so much, I can manipulate them to suit my needs and retain the integrity of the original too.

Here's a photo of the original, it's available in Michelle's Etsy shop.  I'd also like to remind you of the "Under The Sea" challenge at our Michelle Perkett Studio blog, you have until this Monday evening to make a card and enter,  I hope you'll join us for this fun challenge!

Challenges:
Operation Write Home Stars & Stamps - Sketch #41
Stampin' Bee's - An Animal In a Die Cut
2 Sisters Challenge - Birthday
Drunken Stampers - Punch Me
Craft Your Passion - Anything Goes
Incy Wincy - Anything Goes