Pages

Saturday, June 30, 2007

RAK Birthday Cards

Happy Saturday. they say it's my birthday!

My first and second card today are birthday cards from my friends Pat (top) and Judy (bottom).

Pat is my friend in California I met on line through Split Coast Stampers and Judy is my Stampin' Up! upline.

With Pat's card she sent me a box of goodies, stamped Bella images - they're so cool! The funniest part of Pat's birthday gift to me is (just like my kids) I liked the box they came in just as much as the gift! They were packaged in a box that holds 12 Stampin' Up! ink pads, just that morning I was wishing I had one of those boxes for my overflow of craft ink pads.

With Judy's card came a gift certificate for Stampin' Up! products, oh boy!! I'll have to study my new catalog more before I can decide how to use that. I've had lots of phone calls today and e cards too, I have wonderful friends, I feel very blessed. It's been a nice day.

Thanks everybody!

The bottom card is an invitation I made for another friend for her son's baptism. She called me Wednesday evening and described what she had in mind, told me she needed 25 and could I have them ready Thursday afternoon. To which my reply was, sure it's just a print job...
I went to work printing sheets of pictures, sheets of vellum and waited briefly for the ink to dry and cut them apart and assembled them. Wa la, they're ready! She was happy with the finished product and I was happy to have the job. I love it when people call me and ask me to do that kind of stuff.

Friday, June 29, 2007

I'm So Thankful It's Friday!

I just wanted to take a minute tonight to share good news.

I found out recently that my Dad has Prostrate cancer, I went to a doctor's appointment with him today to hear the results of a CT and bone scan. The cancer has spread to the area around the prostrate and into his bones, the good news is they can treat it and stop the cancer with hormone therapy in the form of a shot every four months. It's been a rough week leading up to this and I'm so relieved. All I can say is Praise God!

Tomorrow is my birthday and this is the best gift I could have been given, I'm so thankful.

It was a goodie day at my house while I was gone, my box of Stampin' Up! catalogs arrived along some birthday packages from friends. I'll save that for tomorrow though.

Back to the reason we're here... the card. I made this for my friend Ana to give to her Goddaughter who's in the air force. I've never put camo and flowers together before and I didn't know purple and red went with camo either. I was pleased with the way it turned out!

Supply list: Stamps - Boho Buzz, Paper - Nut Brown, Basic Black, tan, watercolor paper, Ink - Elegant Eggplant, Rose Red, Accessories - Taupe Grossgrain ribbon, Aquapainter, EK Success flower punch, Pink Brads.

Thursday, June 28, 2007

Close To My Heart Flutter

Wow! I just got to a point a moment ago where I didn't think I had anything to do for almost an hour and I'm alone. Yikes!

It's been crazy this week with the kids out of school and getting them back and forth to swim lessons and Vacation Bible School. Not just one VBS going on this week but two! This is a really small town, I think they should talk to each other and have VBS on different weeks. But hey, what do I know??

Anyway, this is a card I made for a friend's birthday not too long ago. I was experimenting with Brilliance Pearlescent ink pads and acrylic stamps. The pigment inks work better on the bold stamps for me, I'd just discovered that. The grossgrain and gingham ribbons were some scraps I had so I was really just playing.

Supply List: Stamps - CTMH Flutter, Stripes from Outlines Rubber Stamp Co., SU Seeing Spots. Paper - Elegant Eggplant, Orchid Opulance, Basic Black and White. Ink - Brilliance Pearlescent Orchid, Lime, Purple and Orange. Accessories - leftover grossgrain and gingham ribbons.

Monday, June 25, 2007

Cycles Of Life

I made these cards using stamped images my friend Pat in California sent to me. I left a comment on one of her cards on Split Coast Stampers and asked where the bicycle stamp came from. She PM'd me and told me and offered to stamp some and mail them to me.

How cool is that! So here's what I've made with them so far.

Each card is from one of Beate's weekend sketch challenges. I'm not used to making square cards or using designer paper and I really had fun with this. It was a great challenge for me.

Supply List: Stamps - Cycles Of Life, SU. Paper - unknown origin other than from my stash of 12 X 12 papers. Accessories - Round and square brads, paper piercing tools.
Thanks for stopping by, have a great day!

Sunday, June 24, 2007

2007 Myanmar Mission Trip Scrapbook Pages

Last Saturday I started posting scrapbook pages I've made of a Mission Trip my friend took back in March of this year and then I got sidetracked. So I thought today I'd put up a few more.

The top picture is the opening page of the scrapbook. I love using background stamps to create my paper. I have a hard time using designer papers and matching them to my card stock so I like to make my own.

Supply List: Stamps - Stampin' Up! Old World Map, Lexicon Of Love, Paper - Thepapermill.com Blue Deep, Sky Blue Light, Ink - Brilliant Blue, Accessories - Organdy ribbon, Chipboard M.

These next 2 layouts are the same, I just wanted to show how I did the journaling. This is an 8 X 8 book and there isn't a lot of extra room for journaling on the pages.
I stamped the images from World Tour on the card stock and then stamped over them with the French Script background.
Supply List: Stamps - World Tour, French Script, Alphabet Fun Upper and Lowercase. Paper - Balsa, Nut Brown. Ink - Creamy Carmel, Basic Brown. Accessories - Tea died gingham ribbon (JKM), Round tab punch SU.

Saturday, June 23, 2007

Ways To Use It Challenge #118

I'm new at the challenges over at Split Coast Stampers and this is my first Ways To Use It challenge. The only requirement was for the card to be square. That's a challenge for me in it's self!

Since I've been working on kids cards I thought Beate's sketch from a few weeks ago would be nice for what I had in mind.

I have a new Stampendous Palm Fronds stamp that I needed for some scrapbook pages and thought it would work well with my "In The Wild" animals too.

I'm pretty new at paper piercing so I had a lot of fun trying that on this card too. It's pretty straight for my first attempt being done freehand.

My sentiment is part of a stamp from Eurekastamps.com, I masked off the part I didn't want to use and stamped it.

Supply List: Stamps - CTMH In The Wild, Stampendous Palm Fronds, Eureka sentiment, Paper - Thepapermill.com Forest Dark, Forest Medium, Carmel Medium, Via Vellum Black, Ink - Noir Black, SU Old Olive, Accessories - LG. Eyelets, Paper Piercing Tool, Circle Punch, Mega Scalloped Circle Punch, Carl Cutter w/ scallop blade.

Friday, June 22, 2007

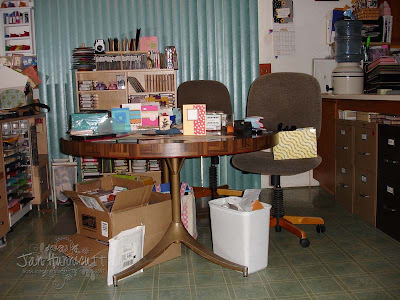
My "Stamping Room" - what a mess!

This is a picture of my "stamping room", it's actually my kitchen. I decided today that I should start putting some of my stuff away that I wasn't using anymore in my current card making.

My kitchen turned into my stamping room, I never meant it to be that way but one thing led to another and now we can't eat at the kitchen table anymore. That's okay, if you ever come to my house and find the kitchen table cleaned off... you know someone special is coming over. I don't invite guests over for dinner so that doesn't happen very often! Why cook when you can stamp?

I did put away some of the stuff I wasn't using on my table today but if I took another picture of the table it looks worse now! I don't understand...

I think I should just dive in and go back to work, making stuff that is!

I'm still having fun with the CTMH In The Wild set. I made this Giraffe card last night before I went to bed.

I worked on a tiger card today but don't have a picture yet, it's late and my kids are asleep and I can't put the eyelets in and expect them not to wake up. I know I should get out of the dark ages with my eyelet setting technique but I just like using my little hammer and making some noise. Because I can!

Thursday, June 21, 2007

Close To My Heart Zebras & Old Sketch Challenges

It's been another productive day card making! I'm working on the end of a project making a dozen kids cards for a customer. I haven't done very many kids cards and I'm having fun with it.

I had one sheet of Zebra striped paper in my stash so I thought now would be a good time to use it with the CTMH Zebra stamp from their In The Wild acrylic set.

The sketch challenge is #118 from several weeks ago. I used it yesterday for a card that I c.a.s.e.d and it worked well for me again today.

I'm one of those people who like the process of card making, I can make dozens of the same card or just one or two and I'm happy. I just like to make stuff...

I only had one sheet of Zebra striped paper, I could get 4 front panels cut from that. I had 2 approximately 2 1/2" strips left over. So I tried them out for the center panel, after all it's just paper! I sure wish I could find my "wild about you" stamp! I would have stamped that in the right bottom corner on this card to finish it off. I'll just have to imagine it's there until I find the stamp.
I stamped 8 Zebra's on a sheet of white card stock and had 2 left when I ran out of Zebra striped paper. But alas, I just happen to have a Zebra print background stamp hidden away in a drawer.

I visited Cambria Turnbow's blog today and she'd made a really cute card with a new Stampin' Up! set and I liked her layout so I tried it for my last Zebra card. I ended up using my 1/4" hand held punch to thread the ribbon through on this last Zebra, my small slot punch wouldn't go through the 4 thicknesses of card stock.

Supply List: Stamps - CTMH In The Wild. Paper - Making Memories Zebra * Wildlife Collection, White, Basic Black. Ink - Noir Black. Accessories - Dotted and regular organdy ribbon, lg eyelets in black and silver, paper piercing template and tools.

Wednesday, June 20, 2007

A Good Day Stamping Is A Good Day Indeed!

My first card is the sketch challenge and color challenge all in one card... kind of! My red turned to rose red, I have barely banana in there with apricot appeal ink, the creamy carmel is confetti tan. It all started with the flower, I didn't have any barely banana ink so I used apricot appeal with the brayer, it didn't look like much so I wondered how the paisley background stamp would look on it, in red, um rose red that is! It had a life of it's own after that.

This was fun to create, I've had a jar of bottle caps since last winter imported from Michigan that I've been hoarding. Now I can say I've used them! Even if it was just two. I think I should have waited for the Crystal Effects to dry in the bottle cap before I took the picture but I couldn't wait!

Supply List: Stamps - SU Paisley Background, By Definition Background, Riveting, Paper - The Papermill.com Berry Med., SU Barely Banana, Confetti Tan. Ink - Apricot Appeal, Rose Red. Accessories - SU On Board Flower, Bottle Cap, Brayer, Crystal Effects, Circle Punch 1".

Now this card is a C.A.S.E. of Dawn Mercedes color challenge card for Split Coast Stampers. To quote her, "she's almost famous" because she got to be the stamper that chose the colors for the color challenge this week.

When I clicked the link to her sample I was awestruck, I thought her card was so beautiful I couldn't help myself I had to make one just like it! I've been told when someone copies you - you're supposed to be flattered, I hope she is...

I've been in a card making frenzy today and I've loved it, It's been a very productive day for me.

...and the Maytag repair man was out to the house today and fixed my broken clothes washer. My hero for the day!

Tuesday, June 19, 2007

RAK & PAPERTREYink. Text Boxed

Look what I found in the mail today from my friend Diane in Canada! What a nice surprise, she enclosed some pretty rick rack ribbon and a round clip I'd never seen before. Fun stuff to play with! Thank you Diane!!

PAPERTREYink. TEXT BOXED

This is the first thing I've made with this set. I copied Nichole's design from her blog but left out a few details and changed the colors. I liked the idea of stamping on both sides of the vellum with the same color ink to make the image look lighter. She showed how to do this on her blog in the preview countdown for this set. So far I like it and can't wait to try the other stamps in the set!

Supply List: Stamps - PAPERTREYink. Text Boxed, Faux Ribbon. Paper - The Papermill.com Berry Medium, SU Certainly Celery, White, White Vellum. Ink - SU Rose Red, Certainly Celery. Accessories - Paper piercing tools, Oval Punches, Quickutz leaves, Rhinestones (WalMart?)

Oh! I almost forgot! I added a guest book this morning, I hope you'll sign it. I'd love to know where everyone is from!

Monday, June 18, 2007

Bella's!

How exciting! My long awaited Bella's have arrived!

I ordered the Rockin' Bella for a friend who has a birthday this month, she plays the rhythm guitar in our band Nexus.

We also have a female bass guitar player, a friend of mine too, so I made her birthday card today also. I like them both, (the cards) but I think I like the top one the best. The one that I have to put away for 6 months!

This Teal card stock came from Thepapermillstore.com, I have Brilliance Pearlescent Jade ink and when I stamped it on one of the swatches it was a perfect match. I like it! Which is a good thing... I have 499 sheets of it left.

I stamped the Brilliance Pearlescent Jade on the first layer of Medium Teal card stock, the second layer of Medium Teal card stock I stamped with Basic Brown. My Bella image is stamped with Noir Black Palette ink on watercolor paper and colored with my Aqua Painter and ink pads, Sahara Sand, Creamy Carmel, Basic Brown and Brilliance Pearlescent Jade. I matted that on a layer of Nut Brown, Medium Teal and Nut Brown again. I like the "shimmer" of the pearlescent ink.

This is my first card. I used a panel of Stampin' Up!s Rebecca designer paper on the Nut Brown card stock. The Bella image is stamped with Noir Black Palette ink on watercolor paper. Watercolored with an Aqua Painter and ink pads, Basic Brown, Pretty In Pink, Creamy Carmel and Brilliance Pearlescent Jade. I matted it with Nut Brown and Pretty In Pink and used 2 pink brads for accents.

Sunday, June 17, 2007

HAPPY FATHER'S DAY!

Happy Father's Day!

After church today the kids and I are going to visit my Dad. He lives about 45 minutes away in Lake Havasu.

I wanted to say a special thanks to my Dad today!
He's always been there for me and encouraged me to step out and take a chance in what ever I've decided to do.

When things haven't worked out exactly the way I've planned, he's been there to tell me it's all going to be okay and to look at the other side of it. An exact quote would be, "turn it over".

He's taught me that life is an adventure to be lived and enjoyed. Go for it!

I'm also thankful and blessed for the way he loved my Mom. They were married over 50 years when she passed away in 2000.

What an awesome gift to give your children. Thanks Dad!

My card today is my Father's Day card for my Dad.

Supply List: Stamps - SU Antique Lace background, French Script background, Itty Bitty backgrounds, Riveting, The Car by Stampington. Paper - Nut Brown, Natural, Black. Ink - Basic Brown, Creamy Carmel, Craft Vanilla. Accessories - Gingham ribbon by JKM, Word Window Punch, Brads, Corner rounder punch, Circle punches.

Have an awesome day everyone!

Saturday, June 16, 2007

Myanmar Mission Trip 2007 Scrapbook Pages

I thought it would be fun this coming week to show some scrapbook pages I've been working on.

This project is a mission trip scrapbook I'm making for a friend of mine.

I'll talk about how I made the pages and I asked him to tell about his trip.

My guest blogger is Louie Marsh from the The Marshian Chronicles who is also the Pastor of our church, Christ's Church on the River here in Parker.

Louie ~
The collage above is a combination of two pictures I took at the Shew Dagon Pagoda in Yangon, Myanmar (most still call it, Rangoon, Burma). I was there on my 4th short term mission trip in February/March of 2007.
The Shew Dagon is the largest and richest Pagoda in Myanmar, a land that is literally dotted with Pagodas. The grounds are huge, and contain many different buildings, altars, etc.
The pictures above show some ancient Buddhist inscriptions and their translation into English that are found there. You can also see the main building, covered in layers of gold, and easily worth hundreds of millions of dollars.
When viewed from a historical or cultural perspecitve all this is very interesting. And that's usually the perspective most Westerners view it from. All the effort and skill that went into the construction of these buildings are impressive indeed.
But as a Christian Pastor I had another point of view - and that one spiritual. To watch very poor people sacrifice time, money and goods to worship statues and stones was very sad. I've been in Myanmar enough to know how desperately poor all but the ruling class is. To watch them pray to dead stones was a moving experience, one that motivated me and those with me to pray even harder for the people of Myanmar.
Jan~
This is another 8 x 8 scrapbook. I like this size because I can run my card stock through my computer printer. The background for this layout is 2 pictures Louie took that I printed as full sheets and cut them to the 8 x 8 size thus making my own scrapbook paper. I then used 2 additonal photos and matted them and attached them to the page on the right.
Supply List: Paper - Royal Fiber Balsa, Basic Black. Computer printer and pictures.

Friday, June 15, 2007

Lace Butterfly

It's late and I just got home from Celebrate Recovery and realized I didn't make anything today.

So I thought I'd share this card with you that I made for the Eureka Stamps card contest back in April.

The techniques I used were Shimmer and Poppin' Pearl Ex.

For the Shimmer technique I sprayed the watercolor paper with my Pearl Ex and hair spray solution after I watercolored the butterfly with my ink pads and aqua painter.

For the Poppin' Pearl Ex I stamped the butterfly image on the Ballet Blue card stock with Versa Mark and used a sponge dauber in my Pearl Ex jar and dabbed it onto the Versa Mark Ink. When I was done I used a Swiffer cloth to take the excess Pearl Ex off of the card stock. It worked great!

Supply List: Stamps - Lace Butterfly by Eureka Stamps. Paper - Ballet Blue, Rose Red, Regal Rose, watercolor paper. Ink - Stazon Black, Versa Mark. Accessories - Pearl Ex powder, Metalic Ribbon SU, aqua painter, sponge daubers.

Thursday, June 14, 2007

Goodies In The Mail!

My Stampin' Up! package came today with stuff from the new catalog that as a demonstrator I can order early.

I was very conservative!

I wanted to see what the new In Colors looked like and thought the Perfect Presentation hostess stamp set might be a nice one for a job I want making a certain Realty offices' Christmas cards. And 4 of the 6 classic ink pads that match the paper.

This is the really exciting part of the mail today! I've made a friend on line at Splitcoast Stampers and she sent me this cool RAK! We did an image swap and she sent extra goodies for me. How fun!
Isn't this cute?! The cello bag is stamped with the Chicken Wire background stamp, the card and "straw" are inside and there's a magnet on the back. I love it! Thank you Pat, you're awesome!!

It's almost 9:00 p.m. here and the temperature outside is still 108, I think summer is here!

If it's 3 minutes before 9:00 p.m. here it's 3 minutes before midnight at PAPERTREYink., gotta go!

Wednesday, June 13, 2007

Sketch Challenges Notebook

I'm pretty new to Splitcoast Stampers Challenges, I really enjoy the sketch and color challenges each week. I don't always have time to do them right away so I've been printing out the sketches for later.

I had a nice pile on my kitchen table so I made a notebook of them for myself. I used 2 - 81/2 x 11 sheets of chip board for the covers.

I have a GBC binding machine so I punched holes in my printed sketches and covers and used Sketch Challenge 103 for the cover of my notebook. I put pictures of my cards from the sketches in the notebook too. I think I just made my own kind of idea book!

You might have also noticed my watermark is showing up on more of my cards and creations. I've had a problem with a free trial of a Photoshop product and Windows Vista so I've been e mailing a friend my pictures and he's been putting the watermark on for me and e mailing them back. He helped me fix the problem today and now I can do it myself. A big THANK YOU to my friend Louie!

Tuesday, June 12, 2007

School's Out

Our friend Pam asked if we'd like to go to Lake Havasu City with her after the kids were done with swim lessons Monday. As you can see our first stop was at the LSS! They have quickie cards for their customers to purchase and make every Monday.
I haven't been able to do this in ages. When my kids are in school I don't make "quick runs" to Havasu. I've lived in a small town most of my life and don't do time well. I think that means I'm usually late...
These are my two youngest children Mikey and Jenny, they're 5 and 7 years old and love to stamp too.

SCS Color Challenge 118, Oh my...

I think I lost a day here. With school being out and my kids being home with me getting stuff done is a challenge. Getting "stuff" to stay done is a bigger challenge!

On to the days events - stamping! It's color challenge Tuesday at SCS so after I got some of my "work" done here I tried out the color challenge.

Do you see any Certainly Celery in the top card? Me either! It just didn't work out...

Supply List: Stamps - Autumn Leaves Rhonna Farrer Flowers (oh!! I found these at WalMart!) Paper - Tempting Turquoise, Chocolate Chip, Watercolor paper. Ink - Cameo Coral, Tempting Turquoise, Chocolate Chip, Noir Black. Accessories - Rhinestones

I used some certainly celery in this one! The colors we are supposed to be using are Cameo Coral, Certainly Celery, Chocolate Chip with an alternate of Tempting Turquoise. You might think I missed the Cameo Coral this time, look closely at the frog's tongue.

My only regret with this card is I wish I would have used Stazon Timber Brown to stamp the frog before I watercolored it.

Whenever I see the colors green and brown together lately I think frog. This is an old TAC stamp I haven't used in ages.

Supply List: Stamps - Frog, The Angel Company, 1997 Stampin' Up! Decorative Dot Background. Paper - Chocolate Chip, Certainly Celery, Watercolor paper. Ink - Cameo Coral, Certainly Celery, Chocolate Chip, Noir Black. Accessories - Cuttlebug embossing folder, those cute eyeballs.

This card is my "oh my"... for the color challenge. I would never have used these colors together left by myself to play! It's not really my style color wise but I kind of like it, someone will buy it I'm sure... One day... hahaha, smirk!

Supply List: Stamps - Autumn Leaves Rhonna Farrer Flowers, PAPERTREYink. Faux Ribbon sentiment, SU Bodacious Boquet leaves. Paper - Certainly Celery, Chocolate Chip, Tempting Turquoise, Cameo Coral, Watercolor paper. Ink - Cameo Coral, Ruby Red, Certainly Celery, Chocolate Chip. Accessories - SU punches, Dotted Organdy Ribbon by StarLitStudio, Large Rhinestone

Sunday, June 10, 2007

CD Mailer Mini Album

It's been a much smoother day today!

The kids and I went to church this morning and I sat in the audience, which I haven't done in quite awhile.

I'm usually back in the sound booth, I get to run the sound system for our worship team on Sunday mornings and our band on Friday nights and also run the Power Point for the projector screen. There's one other guy that helps out and I have to remember not to be a hog and let him have a chance too.

I've been doing some stamping today but what I have to share with you in pictures isn't what I've been working on today.

I was looking through my pictures and noticed this mini album I made several months ago for a friend of mine.

I was going to give a class using a Stampin' Up! Simply Scrappin' kit and discovered that I didn't have any old black and white pictures so I used his.

The kit I used is called Out & About, the paper I used in it is Not Quite Navy, Sage Shadow, Really Rust and the designer paper that comes with the kit. I used the stickers that come with the kit for embellishments. The monogram on the front of the mini album is made with Sizzix Fun Serif alphabet die cuts.

I bought the CD mailers from U Line, they hold 1 CD. I used 12 x 12 paper and cut it into
5 1/2" lengths and taped them together, then measured the inside width of the mailer and used my ScorIt to score every 4 3/4" so I could accordian fold the paper and fit it into the mailer. Then came the fun part, decorating and adding the pictures. After that part was done I used my double sided tape and taped it into the CD mailer, I also put a piece of the Not Quite Navy card stock on the inside of the front cover for a more finished look.

I used some of the designer paper that came in the kit to cover the outside of the CD mailer and a couple of the stickers to go with the monogram and it was done. It took me an afternoon to design that fun little project for us to do and I've made several since then.

I love "containers", boxes, tins, jars, etc. My friends have started to bring me odd stuff because they know I like to make other things out of them. I just like to make things!


Saturday, June 9, 2007

BoHo Buzz

Happy Saturday! I hope you're having a nice weekend. It's late and I've spent the last few hours stamping and having fun after a long day.

I have a new stamp set from Technique Tuesday called BoHo Buzz I saw it online at Scrapsupply and knew I had to have that butterfly and beatle and dragonfly and...

It's taken me awhile to figure out what to do with the butterfly after the initial stamping it on my watercolor paper with Black Stazon ink and watercoloring it with Tempting Turquoise and Green Galore. I saw a nice card that Ana had made over at Inkastamp so I tried to recreate what she'd done with her design.

I really like how Tempting Turquoise and Green Galore look together on the butterfly, I'm not so sure about the rest of the card. But that's okay because I'll go to bed soon and wake up with another idea and try it again.

Supply List for BoHo Buzz Butterfly: Stamps - BoHo Buzz by Technique Tuesday, Hanging By A Thread by Technique Tuesday, Flourishes by Autumn Leaves, Faux Ribbon by PAPERTREYink. Paper - Tempting Turquoise, Green Galore, retired SU designer paper, watercolor paper. Ink - Stazon Jet Black, Tempting Turquoise, Green Galore, Noir Black. Accessories - White grossgrain ribbon, Black brads, foam tape.

The second card is the Beatle out of the BoHoBuzz stamp set. I used the POP designer paper in Certainly Celery with White and Elegant Eggplant cardstock. I stamped the Beatle's body with Brilliance Victorian Violet and the head with Brilliance Graphite Black. I used my scallop circle punch and 2 smaller circle punches for mattings. I added some Grape grossgrain ribbon to it to finish it off.

Our Saturday was kind of unusual around here. Our first outing of the day was to the Emergency Room at our local hospital. My youngest son's eye has been red and swolen, he looked better this morning but said it hurt.

We found out that he has Pink Eye and got the needed RX for him and he was looking and feeling better by tonight.

The other unusual thing for us today was a trip to the laundramat. The washer broke yesterday and about ruined my day! I have a repair person that's supposed to be coming next Friday to fix it. That's how it is when you live in the middle of nowhere.

I think the laundramat was the highlight of the day for my kids and I wish now I would have taken pictures of them.

Oh well. they are 5 and 7 years old and they helped put the clothes in the dryers and the quarters in and push the buttons etc. Then they sat down in front of the dryers and watched their clothes go around and talked excitedly about who's underwear was winning the race, they were so entertained!

I stood there and was facinated watching them watch the clothes dry thinking, "the heart of a child, how fun"!

Friday, June 8, 2007

An Exciting Project From Last Year

I've met some really nice people on line selling my retired Stampin' Up! stamp sets.

I was visiting today with a lady I just met in Wisconsin about being a Stampin' Up! demonstrator and she was really encouraging to me.

We were talking about selling our cards and I told her about a job I had last year making cards for one of our local Real Estate companies. She said she'd like to see pictures of the cards I made, which gave me the idea to write about it for my blog today.

So, Diana if you read this you have to leave me a comment in the comments section so I know!

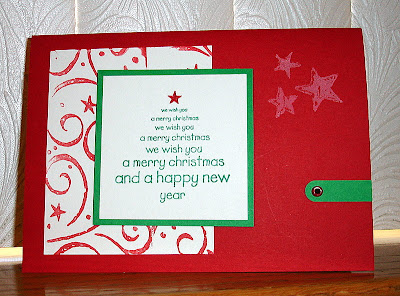
The first card you see was their Christmas card. The card stock is Real Red, White and Gamma Green by AstroBrites. I used the jumbo SU Stars and Swirls wheel on the white card stock in Real Red. Stamped the Christmas tree image in Glorious Green to match the Gamma Green by AstroBrites. My accessories were the Word Window Punch by SU and a Red eyelet. The Christmas tree stamp came from Paper Angel.

The second card was their Thanksgiving card. Again I used a Stampin' Around wheel, this one is called Leaves Awash. The card stock is Pumpkin Pie, Mellow Moss and Vanilla. The ribbon was from JKM Ribbon and the cording is Stampin' Up! as well as the "grateful" stamp. The Happy Thanksgiving stamp is from Sweet Impressions. For Ink I used basic brown.

I tried to keep the design of the cards very simple because I was going to be making A LOT of them.

The last picture is 500 Thanksgiving cards in the process of being made sitting on my kitchen table. It was quite an experience to make 500 of the same card. For some reason I didn't get a picture of 500 Christmas cards sitting on my kitchen table.

I started this project the end of June 2006. My goal was to be finished with them and deliver the cards November 1, 2006. I reached my goal! I worked on them pretty much at my leisure between other projects. It was nice to have that much time to make them.

I don't know if I'll ever use either one of those Stampin' Around wheels again though!

Thursday, June 7, 2007

SCS sc127

Wow!! I'm excited!! I signed on to update the retired Stampin' Up! stamp sets that I've sold and noticed that I've had just over 500 visitors! That's 500 visitors in 17 days, I'm stunned. THANK YOU!

I've been really busy with the sales of my retired Stampin' Up! stamp sets, they are moving out of here pretty quick.

I keep dropping off packages at the post office each morning. It's on the way to swim lessons for the kids so it's really convenient!

If you are interested in any retired Stampin' Up! stamp sets scroll down a few posts and you'll find them. If there's a name beside the stamp set it's no longer available.

On to the card making! This is my card for this weeks sketch challenge at Split Coast Stampers.

I had some new stamps arrive in the mail today! This is a set called Cherish from Close To My Heart. It's a 2 step stamping set similar to Stampin' UP!s except CTMH stamps are acrylic and you can see through them. I don't completely have the hang of stamping with acrylic yet but I'm working on it!

It's wonderful to be able to see through the stamp when you're stamping one layer on top of the other. I like it! So with my new CTMH stamp set I used Stampin' Up! POP designer papers ( I know, shame on me)... I can't help myself sometimes!

Cherish card supply list: Stamps - CTMH Cherish, Paper - Rose Red, Always Artichoke, White, POP designer paper - Stampin' Up!, White Vellum, Ink - Pretty in Pink, Rose Red, Always Artichoke, Accessories - Burgundy eyelets.

Wednesday, June 6, 2007

April Eureka Stamps Card Contest

I've been meaning to talk about this since I started blogging and keep getting side tracked!

This is one of the cards I made to submit to
Eureka Stamps for a card contest they had in April. It won 3rd place! Wow, I was and still am so excited!! It feels more like a "first place" to me!

They contacted me via e mail to let me know I'd won and asked if I'd be interested in joining their design team. I responded with a yes and wanted to know the details. I don't have any details because they are still in the process of setting up their design team.

This e mail came at a time when I was really struggling with my oldest son, his father and other people in my life giving me a hard time. I was discouraged about life at that moment. I know that God's timing is perfect and I'll hear from them again at just the right time too. Probably right when I need that kind of jumping up and down excited high again.

And hey! Check out my cool watermark from Freckled Fun designs! I'm in the process of being able to use it. I have Windows Vista and downloaded a trial version of Photo Shop Elements so I could use the watermark. It takes an updated patch to use Photo Shop Elements with Vista which unfortunately I can't get to download. Better living through modern technology!

Sunflower card supply list: Stamps - Eureka Stamps, Paper - Watercolor paper, Nut Brown, Forest Dark, Forest Medium, Ink - Stazon Timber Brown, Summer Sun, Old Olive, Mellow Moss, Basic Brown, Accessories - Aqua painter, Dotted Organdy from StarLitStudio, Stampin' Sponges.

I inserted the link for Eureka Stamps and discovered that my 3rd place card is still on their home page. Cool!

Tuesday, June 5, 2007

A Stampin' Story

I have a cute story to go with these cards. We had a Stampin' Up! Demonstrators meeting at my house in April and I was the hostess. The girls asked if I'd show them the Soot Technique and I said I'd be happy to!

The funny part of this story is the stamps we used are from Close To My Heart! I did ask before we started if CTMH stamps were okay with everyone and explained the reason for my choice.

So here we are, 6 Stampin' Up! Demo's trying not to catch the house on fire and playing with the wrong stamps.

Oh, the reason for my choice of stamps is IMHO, acrylic stamps lift the soot off the glossy photo paper much better than rubber stamps. IE, they're stickier. (Is that a word?)

You'll need glossy card stock for this project.
Being me, I wondered if my left over glossy photo paper would work and found out that it did.

Use a brayer to put the ink on the glossy card stock/photo paper, then cut it into manageable pieces. Hold your inked glossy card stock over the flame of a candle moving it slowly so the candle smokes and leaves soot on your card stock. The inked side should be over the candle. Next take your stamp and stamp the image in the soot. Be careful not to touch the soot, you'll leave finger prints! The last step is to spray the card stock with an acrylic sealer. Outside!

Check out the tutorial at Split Coast Stampers, it's so much better than my directions!

We used the same spectrum pad on all the glossy photo paper and each image we stamped looked a little different. It was really cool!

Supply List for top card: Stamp set - Flutter by CTMH, Happy Birthday by Sweet Impressions
Paper - Basic Black, Certainly Celery, left over glossy photo paper. Ink - Kaleidacolor Bouquet, Basic Black, Versamark. Accessories - Ribbon from StarLitStudio, candle.

Supply List for bottom card: Stamp set - Flutter by CTMH. Paper - Basic Black, Pixie Pink, Green Galore, left over glossy photo paper. Ink - Kaleidacolor Boquet. Accessories - Cuttlebug embossing folder, green eyelets, candle.