Pages

Tuesday, October 30, 2012

Homemade Pressure Canned Pork n' Beans

Hello blog friends today I'm talking about my newest adventure into home canning.

I love the idea of being self sufficient and I also love making things, I've been wanting to try canning for some time now but didn't think I'd be able to with a glass top stove.  I found a pressure canner at our local big box store and carefully ready over the box to see if I could use it and found out yes I could - so I bought it! 

The adventure begins!  I opened up that box when I got home and read all the directions and the little cook book that comes with it and made plans to can salsa but that's another post...

Today I wanted to share the process of making pork 'n beans.


I gathered my canning supplies and went to work -


I soaked two pounds of great northern beans in water overnight and added 2 teaspoons of baking soda to the water to alleviate their ill affects after my family eats them.


Put everything together to hot pack them.  The 6 quart jars are in the canner sterilizing in the boiling water, sauce heating, beans in warm water, jar lids ready and waiting.


Two cups of beans in each jar and then two cups of sauce.  Burp the jars, wipe the rims with a paper towel dipped in vinegar for a good seal.  When I take the hot jars out of the canner I use a pitcher to take some of the extra water out and also pour some into the pan with the jar lids and rings waiting to soften the seals on the lids.  After putting the lids and rings on I put them back into the pressure canner using a jar lifter.  Put the top on the pressure canner, turn the heat to high and wait for the pressure to build so I can start timing them for 90 minutes at 10 pounds of pressure.  


I've taken a picture of four of the quarts of pork n' beans, one jar didn't seal and one jar I decorated for a hostess gift for a BBQ we were invited to over the weekend.  The jar that didn't seal I put in the fridge and we had pork 'n beans with dinner that night, they were delicious!  


Here's a picture of my hostess gift.  I used a strip of burlap, covered that with a strip of a brown paper bag I'd stamped with a friendship definition, colored some leaves from another stamp set, attached it all to the jar and added a die cut button with a scrap of the burlap used as thread.  The bow on top is made with a little left over burlap mostly to see if I could tie a bow with it.  I hope she likes it!

 My recipe came from Farm Bell Recipes @ Chicken's In The Road and follows:

Makes - 6 pints or 3 quarts
Cook Time for pint jars - 75 minutes, 90 minutes for quart jars  

Ingredients

1 lb great northern beans soaked
1/4 cup brown sugar
1 tablespoon onion powder
3/4 teaspoons prepared yellow mustard
2 tablespoons molasses
3 cups tomato sauce
3/4 cup condensed tomato soup
3 cups water
6 pieces 2″ each of bacon/pork, fried

Directions

Soak beans over night. Mix the remaining ingredients except bacon . For each pint jar, use 1 cup soaked beans. Add 1 cup liquid mixture and stir to mix well. Add 1 piece of bacon and push under liquid. Clean jar rims and adjust lids. Process at 10 pounds pressure for 75 minutes.  For quart jars use 2 cups soaked beans, add 2 cups liquid mixture then add 2 pieces of cooked bacon, clean jar rims and adjust lids.  Process at 10 pounds of pressure for 90 minutes. 

Thanks for visiting my blog today -

Link Parties:


Monday, October 29, 2012

Hambo Stamps Snowman Sled


I have a fun Hambo Stamps card to share with you today!

I used Copic markers to color this fun stamp:

BG000, BG11, BG23
YR04, YR07, YR09
N1, N3, N5
C0, C1, C2
B0000, B01

I kept my layout nice and simple using Hero Arts layering paper in Pool, Via Vellum Black to mat my focal panel and Copic X Press it for coloring.  My snowflake is made using a die as well as the button,  I rounded the corners to soften the edges and thought I was finished.

I picked up my card and noticed there was a brown speck on the upper left corner so I brushed it off and it left a spot, oh no!  I've been playing with making homemade candles recently so I think that's what it might have been.  That's when I decided to add the white pearls.  I covered the smear with the first white pearl, then used my ruler to imitate the line of the snowman sledding down the hill so I could place my other pearls to mimic/duplicate that line.  Black dots would have worked for me too but for some reason I went with white.  Whew... nice save (=

Thanks for visiting my blog today -

Challenges:
Amusing Challenges - Anything Goes
Make It Monday - Anything Goes 

Friday, October 26, 2012

Notes From Home

I know I've been missing from my blog the last week or so...

So I thought I'd give you a quick look at what I've been up to.


My friends brought me almost twenty pounds of ripe tomatoes that were on sale at Food City last week when they came to visit me in Parker.


From the almost twenty pounds I was able to can five quarts of salsa and twelve 12 ounce jars of tomato sauce.   I also made a double batch of homemade Herbal Miracle Balm for holiday gift baskets I'm planning to make for friends and family soon.


The Vanilla I've been brewing for the last six months was ready...


...and I took the day yesterday to make a batch of Orange Honey Soap that smells heavenly.

I've been enjoying myself going from one messy project to the next as a keeper of the home.
 My kids have needed more of my attention than usual lately and the weather is changing to beautiful around here.   

I think I have Arizona fall fever!

Have a great weekend and thanks for visiting my blog today -

Oh!  Jocelan asked in a comment if I'd be sharing soap and salve recipes, yes I will be sharing recipes and tutorials for soaps and salves in the near future.

Thursday, October 25, 2012

Hambo Stamps Leaf Angels


I have a fun Hambo Stamps fall themed card to share today -

I used Hambo Rubber Stamps Leaf Angels & Have A Ball... using Memento Tuxdeo Black ink to stamp on Copic X Press It card stock.  I used Copic markers to color the stamped image and "grassy" background.  I colored this in between doing other things while our kids were home from school on fall break and now I can't find my scrap of paper that I wrote all my Copic color numbers on...  I hate it when that happens!

My layout is very basic and fit nicely into one of my smallest Cheery Lynn Designs French Flair dies.  The card stock colors I used are Stampin' Up! Really Rust and Chocolate Chip.


Today Hambo Stamps kicks off our annual HOGtoberfest sale, where ALL of the
stamps on our website (including digis) will be discounted by 30% --
with even an additional discount applied to our retiring stamps. (Cling
cushion is NOT included in this sale.)  Be sure to visit Hambo Stamps for some great deals!

Thanks for visiting my blog today -

Challenges:

Wednesday, October 24, 2012

Cuddly Buddly Rocker Chick


Cuddly Buddly has a new artist in their store, her name is Christine Groves and she has some of the cutest digital images!  I had the fun of using "Rocker Chick" for my card today.

This cute digital image is colored with Copic markers:

Chick - Y00, Y11, Y13
Beak/Feet - YR04, YR15
Jacket - N1, N3, N5, N7
Guitar - BG11, BG23, BG34, E42, E43, C1-C5
Shades - BG000, BG0000
Background/Outline - B0000, B01

My layout is a sketch I saw on Pintrest and the cardstock colors are Via Vellum Black, Stampin' Up! Summer Sun, Papertrey Ink Smokey Shadow, Hero Arts Bayou & Copic X Press It.  The sentiment I used is from the Papertrey Ink Signature Greetings clear stamp set.  My youngest son is learning how to play the guitar so I thought this might be a fun card for him one day.  

Thanks for visiting my blog today -

Challenges:
Operation Write Home Midweek Throwdown challenge - Celebrate Friendship

Tuesday, October 23, 2012

Mason Jars - Outdoor Lighting


Have you ever thought of using mason jars for outdoor solar lighting?
This photo is of my husband hanging up our newly homemade mason jar solar lights.


Here's a close up view.

I came across lights like this on Pinterest and clicked the links to find out more about them.
What I found out is they are expensive to buy and have shipped.  Which got me to thinking...

I talked to my husband and he told me to buy the supplies and we'd make them.  
I went to our local big box store and purchased a case of pint sized wide mouth mason jars and a dozen solar lights for your yard.  You know the ones that come on stakes to plant in your garden?  We took the lights apart down to the black plastic so they will fit in the top of the mason jar with the ring on it.  They have a silver cover over them that is easy to remove for a perfect fit.  We needed a hanger so they could hang from the eves of the house, we used my Crop O dile to punch holes in the metal ring that screws onto the jars and threaded wire through the holes for a handle.  The wire was in the back of his truck from a fix it job he'd done earlier so it isn't figured into our budget.  The cost for homemade outdoor solar lighting without the wire is approximately $3.00 for each light.


I didn't take pictures as my husband was making them but I did get a picture of our solar lanterns toward the end of the process of putting them together.

They recharge in the Arizona sunshine each day and look wonderful at night hanging from the eves kind of light Christmas lights!

Thanks for visiting my blog today -

Link Party's:

Sunday, October 21, 2012

Notes From Home

Update on Buster the rescue dog after his first week with us -


There are only three pills left in the RX from the vet for the bacterial infection in his intestines, that problem will be behind us soon.


He's settling in and getting stronger and sassier each day -


Enjoying a little neck nibble from Maxine here, his back foot was thumping like when you scratch a good spot on them.


Buster's paw is around Maxine's neck.


Buster seems to be on the bottom of the dog pile a lot, he likes to fall over as they play so that's his spot.


I think he's pretty happy here.

Thanks for stopping by today!

Thursday, October 18, 2012

Hambo Stamps Today Only Sale


Do you know who this handsome character is?   No we haven't adopted another dog this week!

Monica & Tim from Hambo Stamps are celebrating Bailey's first birthday with a sale!

In honor of Bailey's first birthday, save 18% on all digi stamps TODAY ONLY using code "bailey".

If there are any Hambo Digital Stamps you've had on your wish list today's the day to shop and enjoy a little extra savings!

Wednesday, October 17, 2012

Hambo Stamps Just Be-Caws


I have a fun Hambo Stamps card to share with you today!
I used Hambo rubber stamps Just Be-Caws and Crows, colored them with Copic markers:

Y13, Y18, YG01, YG13, YG25, YR07, YR14, B0000, B01, E30, E31, E33, E37.

My layout is Splitcoaststampers Sketch Challenge #406 pictured below:


I used a little creative license with the sketch - I really needed a place to put my sentiment.  The papers I used are some of my favorites from Basic Grey called Ambrosia.  The card stock is Via Vellum Black, Stampin' Up! Really Rust and Copic X Press It.  I used the largest Spellbinders Oval die I had to cut this stamped image out and matted it with a Spellbinders Large Scallop, for the circle where a sentiment might go I chose to use a button made with a Papertrey Ink button die and added a little crochet thread to it.  

Will you be playing in the Hambo Hoedown this week?
Stop by and check out the new challenge here!

Thanks for visiting my blog today -

Challenges:

Tuesday, October 16, 2012

Mason Jars - Jars of Joy?

I'm talking about mason jars again today.
I've had a fascination with mason jars since I was a little girl.  My grandmother used mason jars for home canning and I loved going down to her basement and looking at all those beautifully filled jars.  
Even the empty ones had a beauty of their own all lined up waiting for the day they'd be filled.


I have some of my grandmother's old mason jars and display them in a place of honor in my kitchen.


What I really wanted to share today is that mason jars are great for homemade gift giving.
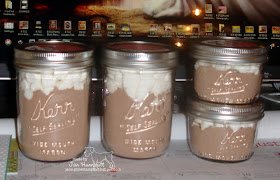
Pictured above are jars of homemade hot cocoa mix I have ready for holiday gift giving.


I made labels for my jars at the Avery website & printed them using my ink jet printer, the directions for use are on the label.  I might add some ribbon and a tag later but I kind of like them just the way they are.
The smaller jars are hot cocoa for two, the larger jars will serve four.  
In December I can give these out to our mail carrier and faithful UPS driver or anyone!

Here's a recipe I found at AllRecipes.com

Hot Cocoa Mix

Ingredients

  • 10 cups dry milk powder
  • 4 3/4 cups sifted confectioners' sugar
  • 1 3/4 cups unsweetened cocoa powder
  • 1 3/4 cups powdered non-dairy creamer

Directions

  1. In a large mixing bowl, combine milk powder, confectioner's sugar, cocoa powder, and creamer. Stir till thoroughly combined. Store cocoa mixture in an airtight container. Makes about 15 cups mix, or enough for about 45 servings.
  2. For 1 serving, place 1/3 cup cocoa mixture in a coffee cup or mug, and add 3/4 cup boiling water. Stir to dissolve. Top with dollop of whipped cream or a few marshmallows, if desired.

If you'd like to do something like this for the upcoming holiday season just "google" hot cocoa mix recipes and you'll find a lot to choose from!

Link Party's
Frugally Sustainable

Thanks for visiting my blog today!

Notes From Home


Day two and our kids are back in school after "fall break".  We had a great time and I'm a little behind on all the Mom stuff, paper crafting stuff, house cleaning stuff...  you get the idea I'm sure!

I have some family pictures from our time together.  We were able to take a day trip to my friend's house in Lake Havasu where the kids and Maxine swam in her pool.  
I thought the water was a little cool but they loved it!  

October in Arizona holds so much promise.  Early in the month you can swim and toward the end of the month the high temperatures are in the 90's with cool mornings.  Changes are coming soon!  The leaves on the trees don't change colors here, I think they breathe a sigh of relief that cooler weather is on the way.  It's time to plant our winter gardens too, we have several tomato plants inside waiting for cool enough temperatures to not just survive but flourish outside.  


I think Jenny was trying to hold the "tired swimmer".  At one point the kids has the swim noodles under the dog to help her float, it was a sight and I missed the photo op.  


We also added an unexpected member to our family while our kids were on break from school.
Meet Buster, he's the guy with all the white on him. 

Buster is a rescue animal from our small town. When we saw him our hearts broke, he's quite thin and hadn't been taken care of very well.   My husband Rick and I talked about all the pros and cons of taking in a second dog, large dog and decided we could give him a good home.  Besides Maxine was crazy about him!


With the afternoon temperatures still in the high 90's here we turn on the sprinklers to keep the dogs cool as they play.  Buster thought it was a great idea, you can't tell but he's rolling on the sprinkler that's on.


Here's some good clean fun going on with Maxine and Buster.

We scheduled an appointment with our local vet yesterday and took the whole family.
We found out Buster is under weight and has bacteria in his intestinal track which is very curable with medicine and a temporary special diet.  Other than that he's in pretty good health for a pooch that hasn't had a very good start in life.  We had no idea how old he is and the vet estimated he's a 2 to 3 year old.


I don't have any really good pictures of him with the kids yet, it's hard to get everyone to hold still right now.  I'm looking forward to making it through the adjustment period and life getting back to some sort of normal around here.  


We also have two house cats that aren't very happy about the new addition even though he's very curious about them.  Buster stuck his nose through the kitty door that leads out to the garage last night and had it swatted by one of the cats.  He was rather perplexed about what had happened. 


This would be the view of what the cats saw on their side of the door in our garage.
The photo is of Maxine one day when I was leaving.

Have a good day & I hope to be back soon with some paper crafting projects to share -