
I have a tutorial to share with you today about using digital papers using Microsoft Publisher or Microsoft Word.
The first thing I have to tell you is my pictures aren't perfect but by seeing them you'll get the idea of how to use and recolor your digital papers so here goes...

To print digital papers using Microsoft Publisher or Word. Open your Word or Publisher program and start with a blank page.

Copy and paste your digital paper onto that page.
I generally re-size my papers to just the size I need in an effort to save my printer inks.

. To re-size the digital paper I right click on the paper, scroll down to “format picture” and click.

. A box will appear on the screen, across the top will be tabs that say, colors and lines, size, layout, picture, text box, web. Click the tab that says “size”. If you look carefully at the picture above you'll see my cursor on the "size" tab.

You will see two rectangular shaped boxes that are side by side that say Height and Width. I usually change my height to 6” and click in the box that says width and it automatically gives the correct width to keep it in proportion. Click OK at the bottom of the box and your paper will be resized. I use 6” so I have enough width for my 51/2”X41/4” card. You’ll see what I mean when you start experimenting.

The paper on the page has shrunk and now you need to move it back onto where you're working. by Holding down the left mouse button on the digital paper drag it to where you want it.

I also copy my new size of paper and paste it on the page if I need more than one. By resizing like this the graphics on the paper are smaller and fit on cards better too.
I’ll also show you how to change the colors on some of your digital papers too. I’ve tried it using the papers that have polka dots and stripes with white backgrounds so far.

Once you have your digital paper sized the way you’d like it, right click on it and scroll down to “format picture” once again and click. . The box will come up for you on your screen. Stay on this box this time. Down toward the bottom of the box you’ll see “Recolor… and Reset”. Click on the “Recolor” button, another box will come up.
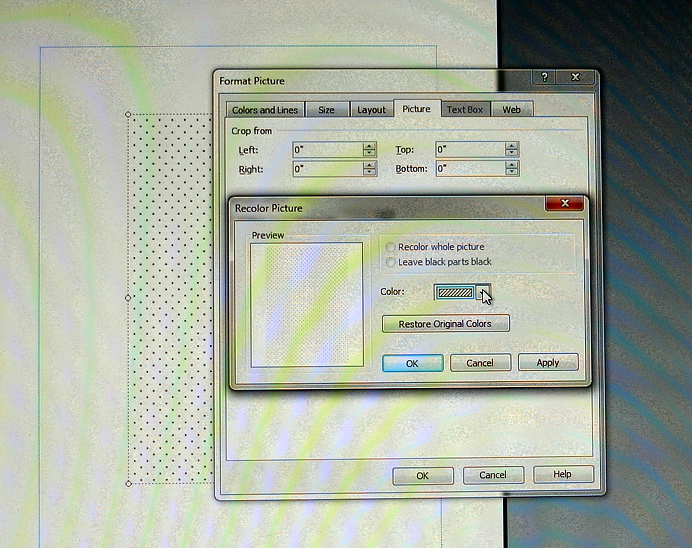
You will see a box with a drop down arrow and “color” to the left of it.

Click the arrow to get to the color choices and pick your color. If you don’t see the color you want click the more colors option.

Choose a color and click OK in that box, the box will disappear and you’ll have the original box to click OK, the paper on your page will turn the color that you chose. Which isn't so easy to see here because my color choice was blue. Not to worry though...
I'm going to show you another paper doing the same thing so you can see the dramatic color change. A couple of card makers have asked about polka dotted papers so that's why I used polka dots in my first illustration. You can also use black polka dotted digital papers and print them on different colored cardstock to get a nice effect.
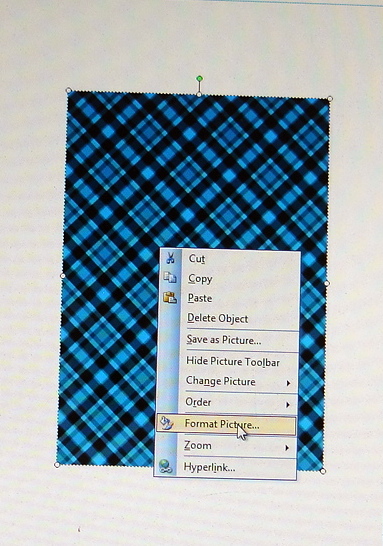
Here's the plaid paper I changed the color on for a recent card you can see here.


One of the questions I’ve been asked about digital papers is do they take a lot of your printer ink? The answer is yes and no. One way to save on printer ink is to choose digital papers with white backgrounds another is to re-size to just what you’ll need.
The things I like about digital papers are they don’t take up much storage space, the don’t fade because I’ve had them forever, they color coordinate beautifully when they come in a set with colored digital images and I can change the color of most of them if I’d like to. Another big thing for me is where I live. There isn’t anywhere in the town I live in to buy patterned papers I have to travel to Lake Havasu 40 miles away and the selection when you get there is disappointing.
I also have an example of how I put my colored digital images on the page with my digital papers so I don't waste the paper (cardstock) either. The images are by The Doodle Pantry.

You can find the polka dotted paper I used at Jak Heath's blog, if you visit be sure to click the tab at the top of her blog that says Jak Heath Designs, she has lots of wonderful digital papers and don't forget to leave a comment to say thanks because it's free. I hope I’ve answered your questions today and found my tutorial helpful.
3 comments:
Jan, wonderful job on this tutorial!!! I have been watching for it and I am very impressed!!!! I have a few digital papers to experiment with and I am going to hunt down some basic polka dots because they seem the most versatile. Thanks for the tip on printing black polka dots on colored card stock - so simple that I had to roll my eyes at the fact that I hadn't thought of it myself! Thanks again, Lisa
Thanks so much for this wonderful tutorial Jan! I've never tried printing my own DP before, but now I feel certain I'll be able to handle it after seeing this! Thanks for taking the time (and many pictures) for this!!
Wow, thanks for a great tutorial. I can't wait to try it!
Traci
Post a Comment