Thursday, January 31, 2013

Zentangles


We have a Craft Night at our church a couple times a month where we get together and work on what ever we happen to be working on and visit.  Last Friday Carole, Sherry and I got together and attempted to learn how to Zentangle.  Carole has a really nice book and we were following the directions.  

All the Zentangles we made turned out looking pretty neat!  Can you see the snake in my first Zentangle? 
I decided to make cards with mine so they didn't end up in a drawer or scrap pile. 


After spending a few hours doing this I think I might feel another addiction coming on...
There is an upside to that though...  I already have the Copic Multi Liners, Pencils & Erasers needed and of course paper isn't really a problem at my house either.

Can you find my initials "JH" in each of the Zentangles?

Thanks for visiting my blog today -

Wednesday, January 30, 2013

Hambo Stamps Snow Heart


I have a fun Hambo Stamps card to share with you today for our Hambo Hoedown, the challenge theme is to use the sketch provided with this cute Hambo Stamps Snow Heart digital stamp set or any Hambo Stamps you'd like to use.  

I have some sad news to share today...  this is my last card as a design team member for Hambo Stamps - the end our term is here and it's time to say a fond farewell.  I've loved being on the Hambo Stamps team, I've had the pleasure of working with two wonderful teams of very talented card makers.  Judy is our team coordinator and I've enjoyed her direction and organizational skills as well as her beautiful cards!  A huge THANK YOU to Monica and Tim Hunter, I've totally enjoyed playing with your stamps and digital images.  If you think you'd ever like to be on a design team I'd highly recommend trying out for the Hambo Stamps team, you'll have a great experience!

I colored this cute Hambo image with Copic markers:

E00, E01, E11, R21
R81, R83, R85
R14, R17, R25
R00, R000, T0
G0000, BG0000

My color inspiration is the Text Style Simple Valentine paper by Papertrey Ink.  My other paper choices are Astrobrights Eclipse Black, Copic X Press It, Neenah Scarlet.

Stop by this weeks  Hambo Hoedown to see all the great cards from our design team!

Thanks for visiting my blog today -

SRM Stickers Happy Birthday Cupcake


Our challenge today at Operation Write Home Stars & Stamps is to make birthday cards for all ages.  
Last September Sandy sent our OWH team an envelope of SRM stickers to play with and this is one of the cards I made with those stickers.  It's been waiting in a file for just the right blog post and it's perfect for this challenge.  The layout is a sketch from Splitcoaststampers that I really liked too!

Thanks for visiting my blog today -

Challenges:
Operation Write Home Stars & Stamps - Birthday Cards
 

Tuesday, January 29, 2013

Handmade Soap Crock Pot Re-Batch


My project today is re-batching soap, I hope you'll join me!
I had a batch of soap that I just wasn't happy with the fragrance and I felt like I had nothing to lose by trying to re-batch it.  I learned things that I'll be sure to do next time too!  Pictured above is soap shavings.  I took several bars to craft night at our church along with my cheese grater.


I had other soap left overs to go in my re-batch, it looks like a lot of soap but it only weighed out to two pounds.  After adding it to my largest Crock Pot I put in 1 cup of water and 1/2 cup of Castor Oil.


Because it filled my biggest Crock Pot, I was a little worried...


You never know what's going to happen till you try so here we go, I turned it on low and waited.

After about an hour it was melting down.  One of the things I learned was not to be afraid to add water a little at a time.  


I made sure to check the temperature several times before adding the fragrance oil so it wouldn't dissipate like before.  It's all part of learning as you go.  This batch could have used more water.  I need to mention here that I had some left over soap shavings that were dark from Chocolate soap and white shavings too that I stirred in just before I put the soap in the molds - you'll see why soon.


The soap molds are experimental and I like the size soaps they produced.


The next day I took my re-batched soap out of the molds.


Cut up the soap logs into bars.  


Set the bars on a baking rack to dry out before we use them.

All in all the re-batching was successful, the soap smells wonderful.  I used Elements Bath & Body Phoenix fragrance oil, it smells similar to the store bought Axe fragrances.  The only thing I would do differently is add more water to the re-batch.  A few of the bars crumbled and broke apart.  Did you notice the specks and spots in the bars of soap?  Those are the soap shavings that I added in just before I put it in the molds. 

Have you ever re-batched your soaps?  

Thanks for visiting my blog today -

Link Parties:


Monday, January 28, 2013

Hambo Stamps Skater Girl


I have a Hambo Stamps card today that I submitted for publication to Summerset Studio for their magazine this month.  The feature was "All Things Aqua" but my card didn't make the cut so I'm free to post it here.

I used Hambo Stamps Skater Girl and kept my layout clean and simple.  She's colored Copic markers and I'm going to add my supply list below.

Supply List:
Stamps:  Hambo Stamps Skater Girl #4311, sentiment computer generated using Batang font bold.
Copic markers:  Skin E00, E01, E11, R21, Dress BG11, BG13, BG23, Scarf Y13, Y15, Y35, Hair YR21, YR14, YR18, E19, Skate Blades C00, C1, Ice G0000, Shadows BG0000, BG000.
Card Stock:  Via Vellum Black, Hero Arts Bayou, Copic X Press It. 
Accessories:  My Favorite Things Snowflake Die, Papertrey Ink Double Ended Banner Die, We R Memory Keepers 1/8th” Corner Chomper.

Thanks for visiting my blog & have a blessed day!

Friday, January 25, 2013

Paper Smooches Zoo Crew


I have a quick cute card to share today using Operation Write Home Stars & Stamps sketch challenge #156 and I also was working on applying the OWH Design Bootcamp ABC's of Color rules.  Hmmm...

I chose this cute giraffe from the Paper Smooches Zoo Crew clear stamp set because it's long and narrow just like the panel in the sketch.  The giraffe is colored with Copic markers:

B0000, B01
E50, E51, E33
YR21, YR24, YR14
BV02

I tried applying the rules of color for my color choices and was doing pretty well until I saw that scrap of striped pattern paper made by Stampin' Up! years ago.  The blue and yellow in the striped paper are complementary colors but the blue and green are coordinating also known as analogous.  This whole thing started out with a scrap of Stampin' Up! Apricot Appeal and it does go with the striped paper but then after I saw the striped paper I didn't  have a use for the apricot paper.  I'm so glad Paula is in charge of the Design Bootcamp because I'd just further confuse us all!

Here's the sketch:


Thanks for visiting my blog today -

Challenges:

Wednesday, January 23, 2013

Whipper Snapper Easter Bunnies


My card today is for our Operation Write Home Stars & Stamps Midweek Throwdown challenge!
Our challenge theme this week is to make Easter cards since the deadline is coming soon.

I love these Whipper Snapper Bunnies and wanted to use Splitcoaststampers Sketch #413 for my card layout.  My only regret with this card is the colors on my computer screen aren't true.  The card stock colors are Papertrey Ink Hibiscus, Via Vellum Leaf Green & Black, Discount Card Stock's Cobalt, and Copic X Press It Blending Card.

Copic Markers:
Basket - E41, E42, E43
Grass/Carrot Tops - YG01, YG13, YG25
Noses & Ears - RV00, RV02, RV04
Carrots - YR65, YR68
Easter Eggs - B41, B21, B23, V01, V12, V15
Bunnies - W0, W1
Background/Outline - B0000, B01

I also used a couple embossing folders for texture and a We R Memory Keepers Corner Chomper.

Thanks for visiting my blog today -

Challenges:
Splitcoaststampers - Sketch 314

Hambo Stamps Plate Spinner


I have a fun Hambo Hoedown card to share with you using Hambo Stamps Plate Spinner, isn't he cute?!  The challenge is to make a round card and add spirals and/or swirls.  My embossing folder has beautiful swirls on it but is pretty covered up so I had fun making paper spirals using a Q Tip that was on the table.  You know one of those left overs from coloring with my Copic markers that's till too good to throw away! 

I used Spellbinders Grands Circles to make my card base and regular Ovals to cut out my cute image.
The Plate Spinner is colored with Copic markers:

N7, N5, N3, N1
E00, E01, E11, R21
BG45, BG49
E43, E42
B60, B63
BG0000

I hope you'll stop by the Hambo Hoedown and see all the fun cards from our design team and accept the challenge too!

Thanks for visiting my blog today -

Tuesday, January 22, 2013

Handmade Comfrey Salve


Have you ever made your own healing salves?  
It's a quick easy process for the most part and can be fun too!

I took a day earlier this month and made several natural healing salves and some lip balm.  
Our climate in Arizona is very dry and my lips have needed some extra TLC is part of the reason for trying some of the new salve recipes.  Pictured above is almost everything I made cooling.


Here are most of the salves packaged and labeled.  I really like using the avery.com website for designing and printing lables - fun, quick and easy!


What do you say we gather some supplies and make a simple Comfrey Salve?

Comfrey is high in calcium and vitamin C.  It is a contact healer, relieving pain and immediately helping to grow new flesh and bone. The Latin name itself translates "knitting together."

One of the main therapeutic substances in comfrey is allantoin, an anti-inflammatory that perks up the immune system, speeds wound healing, and encourages new skin and cell growth. It's a time-honored treatment for healing sores, bruises, and even broken bones. The tannins in comfrey are astringent, and the rosmarinic acid might contribute some anti-inflammatory assistance. Some extracts have shown the potential to decrease tumor growth and extend the lives of lab mice with cancer.
 (info from Bulk Herb Store)

You'll need:
2 cups good quality Olive Oil
1 oz. dried Comfrey Leaves
1 oz. dried Lavender Flowers
1 oz. dried Calendula Flowers 
1/2 cup Beeswax

There are two ways to infuse your Olive Oil with the herbs.  The first being add all three herbs to a mason jar and pour the Olive Oil over them, put the top on and store in a sunny window for four to six weeks.  After the time as elapsed pour herbs and oil through a strainer and it's ready to use.

Or...

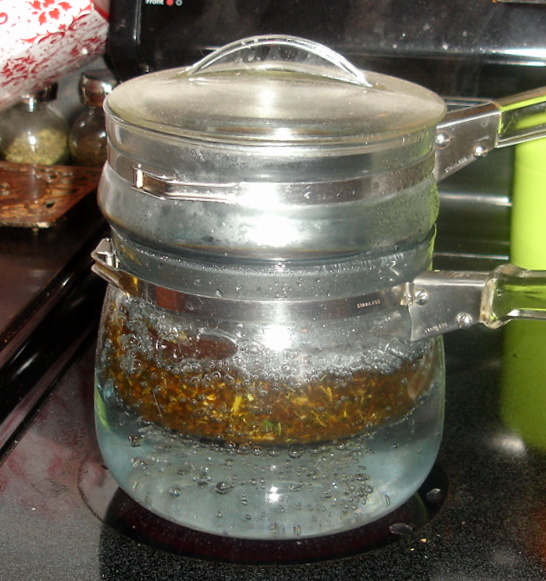
Gently warm your Olive Oil and herbs in a double boiler on the stove top for about 30 minutes.
Pour oil and herbs through a strainer, discard herbs and reserve oil.  Pour your infused oil back into the double boiler and add the Beeswax, heat until mixture is melted together, stir and pour into your containers.  Tins, Mason Jars and twist up or push up tubes work well.  I like the twist up or push up tubes for easy use and application later.


Comfrey Salves cooling.

 The finished product!  2 ounce tins and push up tubes & 1 ounce tins.
Did you know your homemade salves have a shelf life of up to five years if stored in a cool dark place?

I hope you enjoyed reading about making Comfrey Salve today and have the opportunity to try out the recipe.  If you'd rather not make it and would like to buy one I've made you can contact me via e mail, my address is under the contact info tab above.

Need supplies to make your homemade salves?
Bulk Herb Store is one of my favorite places to shop!

Great selection of bulk herbs, books, and remedies. Articles, Research Aids and much more.

Thanks for visiting my blog today -

Link Parties:


Monday, January 21, 2013

Operation Write Home Design Bootcamp


I have fun news from Operation Write Home to share with you!
There's a new free online class starting today called Design Bootcamp at our Operation Write Home Stars & Stamps blog by Paula!  The class that starts today is all about color, I can't wait to dive in and expand my card making skills!  

Paula also chose one of my cards to use as an example:

 
it is just one of many cards from Operation Write Home card makers she used for examples of what she's teaching.  You'll have to click the Operation Write Home Stars & Stamps link to see how it applies!

The stamp on this card is from Penny Black, she's called Mimi In Paris.  My original blog post is here.

Thanks for visiting my blog today -

Friday, January 18, 2013

Hambo Stamps Name That 'Toon

Welcome to our Hambo "Name That Toon" blog hop!

If you are following along in the hop you should have arrived from Dawn's blog Sunnyside Up if not the beginning is at Talk To The Ham.
The challenge for this blog hop is to create a project that represents and depicts a comic strip! 
Maybe it’s your favorite one you read as a kid like mine!

I was a little girl in the 1960's can you guess from looking at my card my favorite Sunday newspaper comic? 

 
That's right Family Circus!  Do you remember Dolly, Billy and Jeffy?

I used Hambo Stamps Dress Up for my take on Dolly & Billy's dress up play.
I colored this cute rubber stamped image with Copic markers:

Dress/Tie/Hat - Y13, Y15, Y17
Shirt/Purse/Hatband - B63, B60
Flowers R35, R46
Hair & Skin - E35, E37, E39, E55, E49, D57, E59, E00, E01, E11
Jacket/Hat - N1, N3, N5
Background - BG000, BG11, BG23
and kept the layout simple just like in the cartoon.

A prize will be awarded to one participant whose comic strip-themed creation tickles the Bacon Bits’ fancy in a hammin’ jammin’ way!  Another prize will be awarded randomly to a hopper who comments on all of the blogs along the way. The winners will be announced on the Hambo company blog, Talk to the Ham, on Wednesday, January 23, as well as at the Hambo Hoedown challenge blog. We love comments anytime, but the deadline for prize entry comments is Sunday, January 26 at 5 PM CST. Don't miss it!
 
The next stop on our hope is Jane, enjoy!
Thanks for visiting my blog today -

Wednesday, January 16, 2013

Hannah Lynn Deevonne


I love coloring Hannah Lynn images. One of the reasons I love these images is their fabulous hair.  The Hannah Lynn digital image Deevonne is used for my card in a Copic coloring video.  

Copic markers used for her hair are: W9, W7, W5 & W3.

My card layout is a sketch from Card Positioning Systems and the papers I've used are Papertrey Ink Smokey Shadow, Via Vellum Leaf Green, Neenah Solar White & 70# white text weight to print my digital paper from Sassy Designs called Kara.

Thanks for visiting my blog today -

Challenges:

Hambo Stamps Refrigerator


Are you ready for this week's Hambo Hoedown!

If you played along last week you received the Hambo Stamps Refrigerator in your e mail and just found out the challenge is to use "Left Overs", lol. 

I have the usual pile of scraps beside my paper trimmer so I went through them and found these digital papers I'd printed, polka dots and zebra stripes and thought oh boy here we go!  I decided I'd like my new refrigerator to be red so I printed it on Neenah Red Pepper Linen card stock and cut it out.  I reprinted it on Stampin' Up! Basic Gray and again on Mohawk Bright White to be able to cut out the details.  I used a few Copic markers to add color to the school art work and cut out my sentiment with a Die-namics Fishtail Flags die.  My layout is Splitcoast Stampers sketch #418.

We were asked if we'd show where our left overs came from too:


A couple of cards I made for my Operation Write Home box using another favorite Splitcoast Stampers sketch.

Thanks for visiting my blog today!

Challenges:
Splitcoast Stampers - Sketch #418

Tuesday, January 15, 2013

Handmade Journal


I've been blogging on Tuesday evenings about handmade soaps, lotions & bath products, etc. and thought I should show you my handmade journal.  

I thought it would be a good idea to make a journal of all my handmade goodies to keep in one place.  I've read on several soapers blogs to keep a record (journal) of all your soap recipes and write notes about how it came out and any adjustments you might make the next time you use it.  I've also made soap with friends at their homes and needed to go online to check something and not had an internet connection, that really slows things down!  

For the journal I bought a half sheet binder at Staples.  I was surprised to see they come in fun colors now not just white.  I like the pocket in the front so I can do my own art work.  I downloaded and printed a digital image of Lavender from a coloring page website and colored it with my Copic markers.  Added my title and a neat bible verse to complete the cover and popped it in the binder pocket.


They even have dividers for this size binder now, I'd planned to make my own but since they already did the work for me...  This is the cover of my Soap Recipes divider.  I found this cute hippo on one site and the bathtub on another and thought it would be fun to combine them.  They are also colored with my Copic markers.  


Here's what the journal looks like with recipes and dividers  for various things in it - a work in progress.  Pictured is my recipe version for Chocolate Espresso Soap.   I don't want to share all the recipes with you because some are from other bloggers websites and I want to be a respectful blogger.  As I make the recipes and blog about them I will direct you to their websites at that time. 

My journal is a very simple concept using Microsoft Publisher to print the pages.  I like the three ring binder because it enables me to be able to expand and add more recipes.  I can add my own touch with art work if I choose and it can be a work in progress.

Do you like to keep your recipes for handmade goodies in a journal?  On your computer?  Haven't thought about it yet?  I'd love to hear from you so let me know how or if you organize your recipes!

Thanks for visiting my blog today -

Link Parties: